


Whether you’re spinning up new servers, managing existing instances, or orchestrating deployment workflows. automation is a critical component of efficient cloud infrastructure management, enabling teams to save time, reduce human error, and ensure repeatable deployments.
This guide explores how to leverage Python scripts to automate tasks on Kamatera’s cloud platform, including running scripts, managing files, and scheduling jobs.
Create a Kamatera account
Go to console.kamatera.com and sign up for an account by providing the following information:
Verify Your Email: Click the verification link sent to your email by Kamatera.
Password: Enter your password.
Repeat Password: Re-enter your password and click Create Account.

Enter your username and password and click Login to access Kamatera Management Console.

Navigate to My Cloud on the left pane, select Servers and click on Create New Server or click on Create New Server on the right pane.

Choose the zone that works best for you:
-
-
- Asia
- North America
- Europe
- Middle East
-
Note: For this setup, we used the Asia server domain to set up an Ubuntu server.

Now, choose an image.
Kamatera offers a variety of app and server images to help users set up preconfigured resources. Users can explore options such as:
-
-
- Server OS images
- Desktop OS images
- App images
- Service images
- My private images
-
For this case, we will select Server OS Images and select Ubuntu.

Under Choose Version, from the drop-down menu, select the latest version of Ubuntu.
Note: Always select the latest version.
Once the version is selected you can see message as: “Ubuntu Server version 24.04 LTS (Noble Numbat 64-bit)”
Toggle the Detailed view button to enable you to view the detailed description, including the price. For this use case, we’ve used the server specifications below. Select whichever server specs you need.

Choose server specs
| Field | Description |
| Type | Type B-General Purpose: Server CPU are assigned to a dedicated physical CPU thread with reserved resources guaranteed.
Type D–Dedicated: Server CPU are assigned to a dedicated physical CPU Core (2 threads) with reserved resources guaranteed. Type T-Burst: Server CPU are assigned to a dedicated physical CPU thread with reserved resources guaranteed. Exceeding an average usage of 10% will be extra charged for CPUs usage consumption. Type A-Availability: Server CPUs are assigned to a non-dedicated physical CPU thread with no resources guaranteed. Note: More information on CPU types is available on the My Cloud- Pricing page. |
| CPU | Choose the number of vCPUs that will be installed on the server. Type B/T can be configured with up to 104 vCPUs per server. Based on Intel’s latest Xeon Processors, 2.7 GHz+. |
| RAM | Choose the amount of RAM that will be installed on the server. Type B/T/D can be configured with up to 512GB RAM per server. |
| SSD DISK | Choose SSD Storage Size. You can add up to 15 SSD Disk. SSD Storage includes unlimited IOPS and unlimited storage bandwidth, free of charge. |
| Daily Backup | Toggle the switch to enable extended daily backups of your server’s storage to external backup storage. |
| Management Services | Toggle the switch to enable Management Services to the server’s operating system by Kamatera Technical Support Team. |
Choose networking
Users can select the network they wish to use, whether it is a public Internet network or a private local network.

| Field | Description |
| Public Internet Network | Check to connect the server to a network interface connected to Public Internet Network. |
| Private Local Network | Check to connect the server to a network interface connected to Private Local Network. |

| Field | Description |
| NIC #1 | Select WAN from the options available in the drop-down menu.
Select auto from the options available in the drop-down menu.
Select auto from the options available in the drop-down menu.
|
| WAN Traffic | Select 5000 GB per month/ on 10 Gbit per second port. |
Advanced configuration
Hide – If the user wants to hide the advanced configuration.
Show – If you want to see the advanced configuration.

| Field | Description |
| Install Script | Enter the script here to execute once the server is created.
Note: For Windows system use Power Shell. |
| Keep Server On Failure | Do not terminate server if atart up acript or provisioning fails |
| Server Notes | Enter any server notes to be noted. |
| Tags | Select the Tags from the drop-down menu and click Add Tag. |
Finalize settings
Finalize settings by setting the password, re-validating it, selecting the number of servers, specifying the server’s name, and enabling the Power On Servers option.

| Field | Description |
| Password | Select password
Password allowed characters: a-z, A-Z,0-9 !@#$^&*()~ and must need the following requirements:
|
| Validate | Re-enter the password to validate. |
| Servers | Select the number of servers the user wants. |
| Name # 1 | Enter the name of the server. |
| Power On Servers | Switch on the toggle button to see the details |
Note: Once the user enters the details in Finalize Settings, they can select either the monthly or hourly billing.
Billing cycle and pricing

You can select either monthly or hourly billing.
Note: The Server Summary displays the location, operating system (including server specifications), add-on services, servers, and pricing.
Click Create Server. In Tasks Queue, you can see the Ubuntu Server is downloading.

Once the installation is successful, you will see the message as Success beside the server’s name and Ubuntu Server is reflected in the Server Management dashboard.
Click Open, beside the Ubuntu Server.

A new screen appears. The Overview tab in the center is selected by default and it displays information like Power state, Guest OS, Zone, Public Internet (WAN), Server ID of the server and Configuration-Number of CPU. Memory Size, Disk 1.
Click on Connect to connect to the server.

Now, click on Open Remote Console to open a new terminal.

In the terminal, enter the Username and Password that you mentioned while creating a server (Step 7).
Connect to your Kamatera server
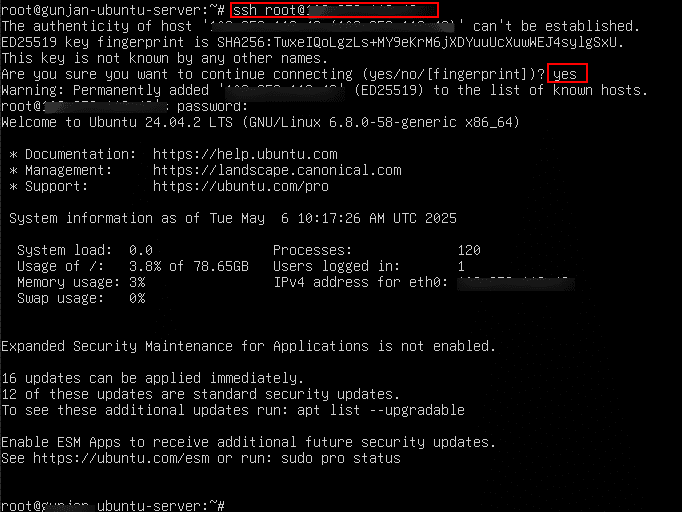
To begin automating tasks, you’ll first need to connect to your Kamatera server.
Use the following command on your local machine (Linux, macOS, or Windows with PowerShell or WSL):
Command: ssh root@your-server-ip
Replace your-server-ip with the public IP address of your Kamatera server (e.g., 198.51.100.25) or use Kamatera’s web console.|
Install Python and dependencies
To run Python scripts, you first need to ensure that Python and its package manager, pip, are installed. These tools allow you to execute Python code and install additional libraries or dependencies your scripts may need.
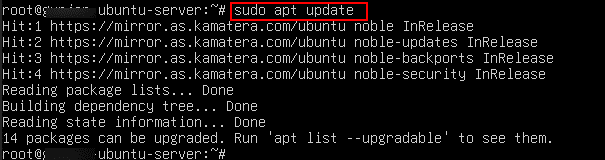
For Ubuntu:
Command: sudo apt update
This command updates the list of available packages and their versions from the Ubuntu repositories.
Command: sudo apt install python3 python3-pip –y
-
-
- python3 is the actual Python interpreter.
- python3-pip is the package manager for Python—it lets you install Python libraries like requests, flask, or psutil.
- The -y flag automatically says “yes” to any prompts during installation, so you don’t have to manually confirm.
-
![]()
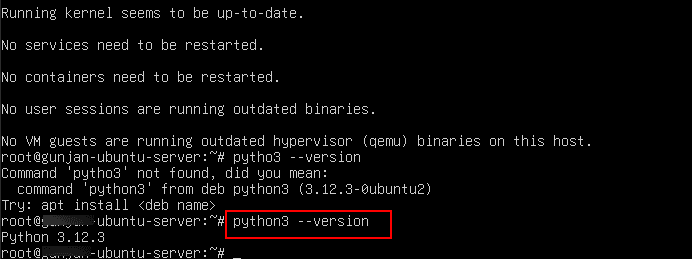
Check Python version
After installing Python, it’s important to verify that the installation was successful and to confirm which version of Python is available on your server.
Command: python3 –version
Create your Python script
If you prefer to write or edit the script directly on the server (or just want a quick test script), you can use the nano text editor. It is already installed on most Linux systems.
Create it directly on the server:
Command: nano my_script.py
-
-
- nano opens a text editor in the terminal.
- my_script.py is the name of your Python file. You can name it anything you like, just make sure it ends with .py.
-
![]()
After running the command, the nano editor opens, for testing purposes write a simple script
print (“HI”)
After you’ve edited in the Nano editor, you need to save and exit.
-
-
- To save your changes: Press CTRL + O (this stands for “Write Out”).
-
When prompted to confirm the file name, press Enter to save the file with the default name.
-
-
- To exit Nano: Press CTRL + X (this stands for “Exit”).
-
Your changes will be saved, and you’ll return to the terminal.

Command: python3 my_script.py
When you run this command, Python will read and execute the code inside the file line by line.

Run scripts manually or with cron jobs
You can run your Python script either manually on demand or automatically on a schedule using cron, a built-in Linux tool for task automation.
-
-
- Manual: This command runs the script immediately and shows the output in your terminal. Use this method if you’re testing or running the script infrequently.
-
Command: python3 my_script.py
-
-
- Automated via cron: To run your script automatically at scheduled intervals, you can use a cron job.
Edit the crontab by running the below command:
- Automated via cron: To run your script automatically at scheduled intervals, you can use a cron job.
-
Command: crontab –e
When you run the above command for the first time, you may be prompted to select a text editor to edit your cron jobs. Since we’re using the Nano editor (which is user-friendly), choose option 1.
So, type 1 in this line, Choose 1-4 [1]: 1, as shown in the screen below. Press Enter to proceed.

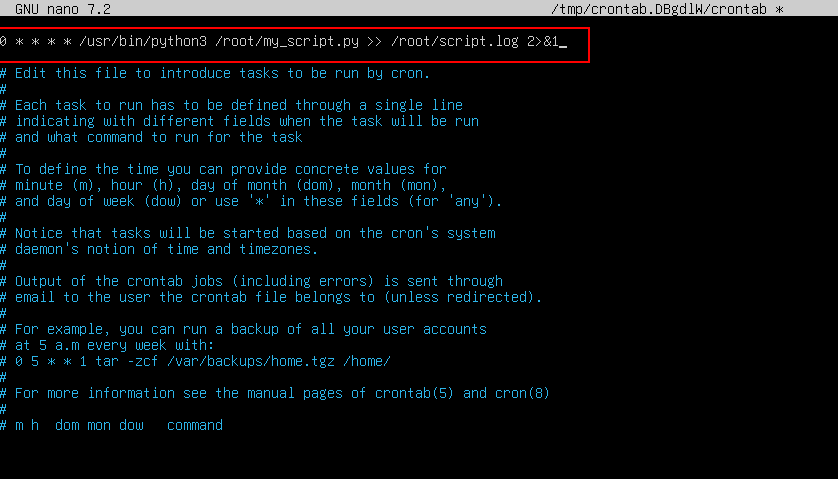
Now the Nano editor will open and you can add your cron schedule at the bottom of the file.
Add a line like : 0 * * * * /usr/bin/python3 /root/my_script.py >> /root/script.log 2>&1
This runs the script hourly and logs output.
After you’ve edited the crontab file in Nano, you need to save and exit.
-
-
- To save your changes: Press CTRL + O (this stands for “Write Out”).
-
When prompted to confirm the file name, press Enter to save the file with the default name.
-
-
- To exit Nano: Press CTRL + X (this stands for “Exit”).
-
Your changes will be saved, and you’ll return to the terminal.
In the terminal, you will see, crontab: installing new crontab. This means that your new or updated cron job has been successfully saved and installed.
![]()
Automate tasks with Python
Python is a powerful scripting language you can use to automate routine server tasks. Once your script is written and tested, you can run it manually or schedule it with cron.
Common Automation Use Cases:
-
-
- Server Maintenance – Delete old log files, clear temp directories, or apply updates.
- Monitoring – Check CPU, memory, or disk usage and alert when thresholds are crossed.
- Data Collection – Pull data from APIs or remote servers on a schedule.
- Integration – Sync systems, trigger other workflows, or clean/format data.
-
Example:
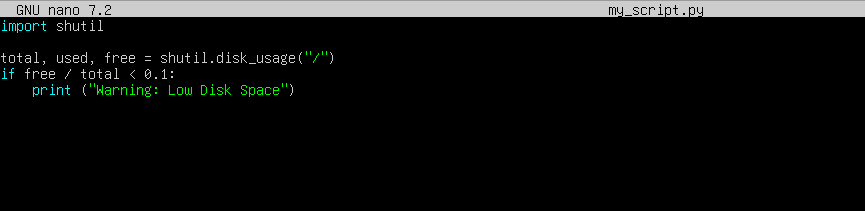
Monitor disk usage and send an alert- This Python script checks your server’s disk space and prints a warning if it’s getting low.
Command:
import shutil
total, used, free = shutil.disk_usage(“/”)
if free / total < 0.1:
print(“Warning: Low disk space!”)
Command: python3 my_script.py
When you run this command, Python will read and execute the code inside the file line by line.
![]()
Use virtual environments
When working on Python projects, it’s a best practice to use a virtual environment to manage your project’s dependencies. This ensures that packages installed for one project don’t interfere with packages from another.
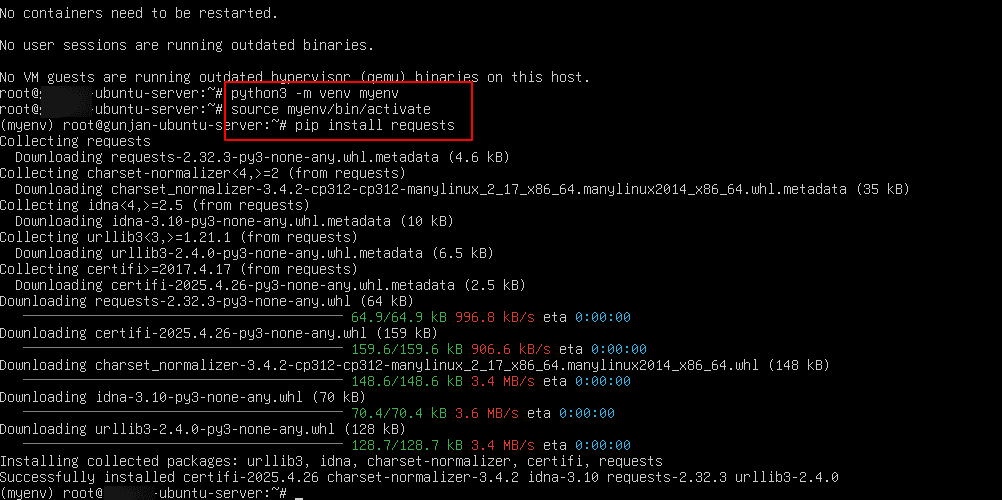
Command: python3 -m venv myenv
-
-
- python3: Runs the Python 3 interpreter.
- -m venv: Uses Python’s built-in venv module to create a virtual environment.
- myenv: The name of the virtual environment folder that will be created in your current directory.
-
After running this command, a new folder named myenv/ is created. It contains a self-contained Python installation with its own pip, Python binaries, and installed packages.
In the below screen, if you see after running the command: python3 –m venv myenv, we will see a message, the virtual environment was not created successfully, because ensurepip is not available. So, first install python3-venv package by running the below command.
Command: sudo apt install python3.12-venv
When asked “Do you want to continue? [y/n]”. Enter “y”.

Set up and use a Python virtual environment
Using a virtual environment allows you to manage dependencies in isolation for each project.
-
-
- Command: Python3 -m venv myenv
-
This command creates a virtual environment.
-
-
- Command: source myenv/bin/activate
-
This command activates the virtual enviraonment
-
-
- Command: pip install requests
-
This command installs python packages.
The ls command is used in Linux (and other Unix-like systems) to list the contents of a directory.
Command: ls
This will display the names of files and folders in your current directory.

Going forward, we recommend the following steps to secure and monitor your server.
-
-
- Use firewalls and only expose necessary ports.
- Install monitoring tools (like Netdata or Prometheus exporters).
- Regularly update packages:
-
Command: sudo apt update && sudo apt upgrade -y
And that’s it! You have successfully learned how to utilize Python scripts for automation on your Kamatera server.