


PHP (Hypertext Preprocessor) is a widely used server-side scripting language designed for web development. It can be embedded directly into web pages, making it easy to integrate dynamic content with static web pages. PHP is commonly used with MySQL and PostgreSQL to create data-driven websites and applications. It can be run on various operating systems like Windows, Linux, and macOS and supports web servers such as Apache and NGINX.
With Kamatera’s high-performance cloud infrastructure, developers can easily deploy PHP-based web applications on customizable virtual machines. Kamatera supports multiple operating systems including Linux, Windows, and macOS, and offers flexibility to run web servers such as Apache or Nginx, allowing for a scalable and reliable PHP hosting environment.
Create your Kamatera account
Go to console.kamatera.com and sign up for an account by providing the following information:
- Verify Your Email: Click the verification link sent to your email by Kamatera.
- Password: Enter your password.
- Repeat Password: Re-enter your password and click Create Account.

Enter your username and password and click Login to access Kamatera Management Console.

Navigate to My Cloud on the left pane, select Servers, and click on Create New Server or use the Create New Server option on the right pane.

Choose the zone from the following options:
- Asia
- North America
- Europe
- Middle East
Note: For this setup, we used the Asia server domain to set up the Windows Server.

Choose an image
Kamatera offers a variety of app and server images to help users set up preconfigured resources. Users can explore options such as:
- Server OS images
- Desktop OS images
- App images
- Service images
- My private images
Choose Server OS Images and select Windows Server.

In Choose Version, select the latest version of Microsoft Windows Server (2022_standard 64-bit).

Upon selecting the version, the License prices are displayed.

Toggle the Detailed view button enable to view the detailed description, including the price.
For this use case, below server specifications are selected. You can configure it according to your requirements.

Choose server specs
| Field | Description |
| Type | Type B-General Purpose: Server CPU are assigned to a dedicated physical CPU thread with reserved resources guaranteed.
Type D–Dedicated: Server CPU are assigned to a dedicated physical CPU Core (2 threads) with reserved resources guaranteed. Type T-Burst: Server CPU are assigned to a dedicated physical CPU thread with reserved resources guaranteed. Exceeding an average usage of 10% will be extra charged for CPUs usage consumption. Type A-Availability: Server CPUs are assigned to a non-dedicated physical CPU thread with no resources guaranteed. Note: More information on CPU types is available on the My Cloud-Pricing page. |
| CPU | Choose the number of vCPUs that will be installed on the server. Type B/T can be configured with up to 104 vCPUs per server. Based on Intel’s latest Xeon Processors, 2.7 GHz+. |
| RAM | Choose the amount of RAM that will be installed on the server. Type B/T/D can be configured with up to 512GB RAM per server. |
| SSD DISK | Choose SSD Storage Size. You can add up to 15 SSD Disk. SSD Storage includes unlimited IOPS and unlimited storage bandwidth, free of charge. |
| Daily Backup | Toggle the switch to enable extended daily backups of your server’s storage to external backup storage. |
| Management services | Toggle the switch to enable managed services to the server’s operating system by Kamatera’s Technical Support Team. |
Choose networking
Users can select the network they wish to use, whether it is a public Internet network or a private local network.
Simple mode:

| Field | Description |
| Public Internet Network | Check to connect the server to a network interface connected to Public Internet Network. |
| Private Local Network | Check to connect the server to a network interface connected to Private Local Network. |
Advanced mode:

| Field | Description |
| NIC #1 | Select WAN from the options available in the drop-down menu.
Select auto from the options available in the drop-down menu.
Select auto from the options available in the drop-down menu.
|
| WAN Traffic | Select 5000 GB per month on 10 Gbit per second port. |
Advanced configuration
- Hide: to hide the advanced configuration.
- Show: to see the advanced configuration.

| Field | Description |
| Install Script | Enter the script here to execute once the server is created.
Note: For Windows system use Power Shell. |
| Keep Server On Failure | Do not terminate server if start up script or provisioning sails |
| Server Notes | Enter any server notes to be noted. |
| Tags | Select the tags from the drop-down menu and click Add. |
Finalize settings
Finalize settings by setting the password, re-validating it, selecting the number of servers, specifying the server name, and enabling the Power On Servers option.

| Field | Description |
| Password | Select password
Password allowed characters: a-z, A-Z,0-9 !@#$^&*()~ and must need the following requirements:
|
| Validate | Re-enter the password to validate. |
| Servers | Select the number of servers the user wants. |
| Name # 1 | Enter the name of the server. |
| Power On Servers | Switch on the toggle button to see the details |
Billing Cycle and Pricing
The user can choose between monthly and hourly billing cycles.
Note: The Server Summary displays the location, operating system (including server specifications), add-on services, servers, and pricing.
Click Create Server.

Click on Tasks Queue to see the progress of installation of Windows Server.

The server will be created and will appear on the Server Management screen. Once the server is created, click Open.

A new screen shows up. Overview tab in the center is selected by default and it displays information like Power state, Guest OS, Zone, Public Internet (WAN), Server ID of the server and Configuration-Number of CPU. Memory Size, Disk 1.
Click on Connect to connect to Windows Server.

Connection credentials like Connection Type, Username, and Password are shown. Now, click on Open Remote Console.

A new tab opens, connecting to the new server and displaying the Server Manager Dashboard.
PHP on Windows
- Go to www.php.net/downloads.php and click on Windows downloads.

2. A new page opens,
Under VS16 x64 Thread Safe (2024-Jul-30 18:09:04), click on Zip [30.81MB].

3. Click on Open file under Downloads on top right corner.

4. It will navigate to Downloads section in File explorer. It is a zip folder, so click on Extract All.

5. Change the destination of the file where you want to save by clicking on Browse. Otherwise, leave it as it is and click on Extract.

6. Now, you can see all the files are extracted.

7. Now, add this PHP path in the Environment Variables.
- Go to Windows search bar and type Environment Variables. Select Edit the system environment variables.

8. In the System Properties window, click on Environment Variables.

9. Under System variables, double-click on Path.

10. A new window opens.
- In the Edit environment variable window, click on New and copy the path and click OK.

- Click OK in Environment variables window.
- Click OK in System Properties window.
11. Now, type command prompt in windows search bar. Select Command Prompt.

12. Check the version of PHP by running the below command.
Command: php -v (or) php –version

13. Create a file using php
- Create a folder on desktop and name it.
Note: As an example, a folder is created as php folder.
- Double-click on the folder.

14. In the php folder, create a text document.
- Right-click on empty space.
Select New and select Text Document.

15. Name the file as filename.php (php is the extension of the file).
- If you cannot name the file with php as its extension, then
- Click on View in the menu bar.
- Check the box next to File name extensions.
- Now, you should be able to add php as extension.
Note: Here, as an example, demo.php is created.

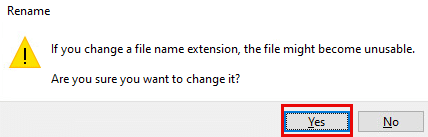
- Click on Yes.
- Double click on file (here, demp.php).
16. Visual studio code editor opens with the file name.
- Write a sample code.
<?php
echo “Welcome to PHP!”
?>
- Now, click on File->Save to save the file.

- Go to windows search bar and type command prompt and select Command Prompt (or)
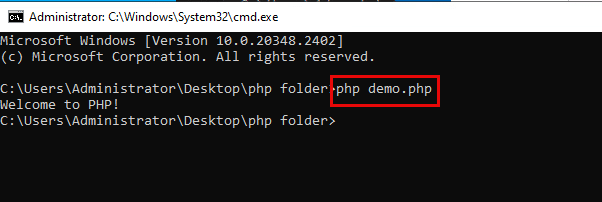
- Click on the folder symbol and type cmd as shown on the below screen. It will navigate to the command prompt directly.

- You can see in the command prompt; we are directly in the folder that we created (ex: php folder).
- Check whether you can see the file and its contents by running the below command.
Command: php filename.php
Note: demo.php is the file that is created.
- You can see the file content.
Output: Welcome to PHP!
Congratulations! You have successfully set up PHP on your Kamatera cloud server. Happy scripting!