WordPress is a free and open-source content management system (CMS) and blogging platform, website builder, and domain hosting solution. With WordPress, you can create a wide range of websites, from personal blogs to complex e-commerce platforms, as well as design and manage your site with minimal technical expertise. While WordPress offers immense flexibility and ease of use, optimizing its hosting environment is crucial for ensuring fast performance, high availability, and scalability, especially for traffic-heavy websites or resource-intensive applications.
Here is a step-by-step guide to optimize your WordPress hosting on a Kamatera cloud server.
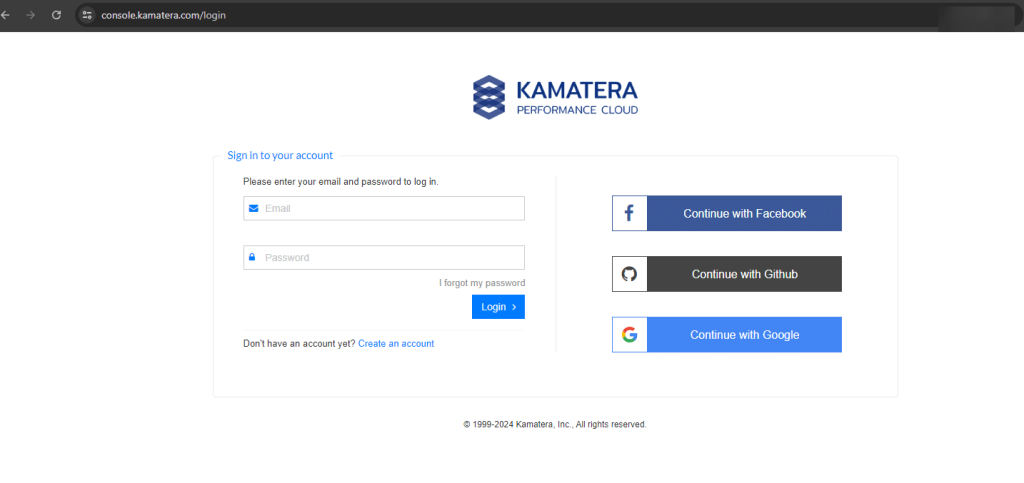
- Enter your credentials to access the Kamatera management console. Click Login.
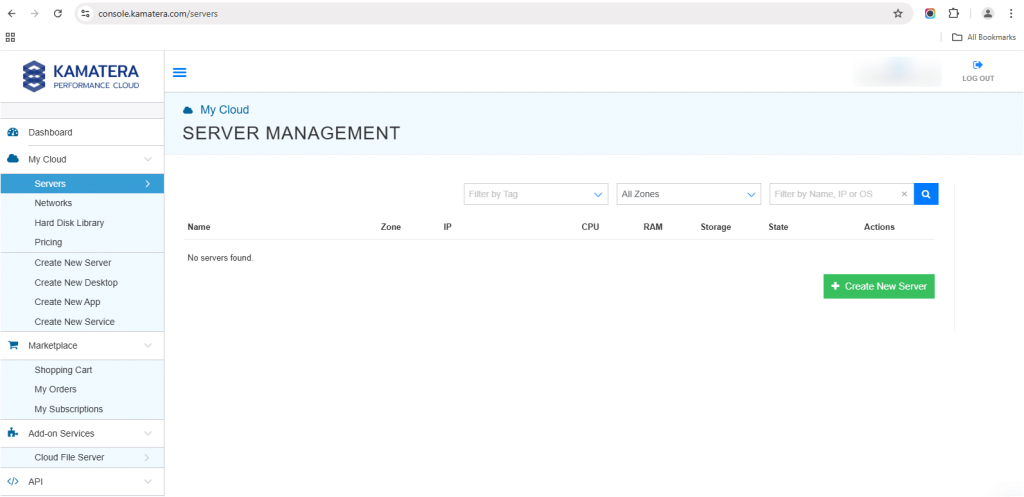
2. Navigate to My Cloud on left hand side. Select Servers.
From the left-side navigation menu, click on Create New Server or use the Create New Server option on the right-hand side.
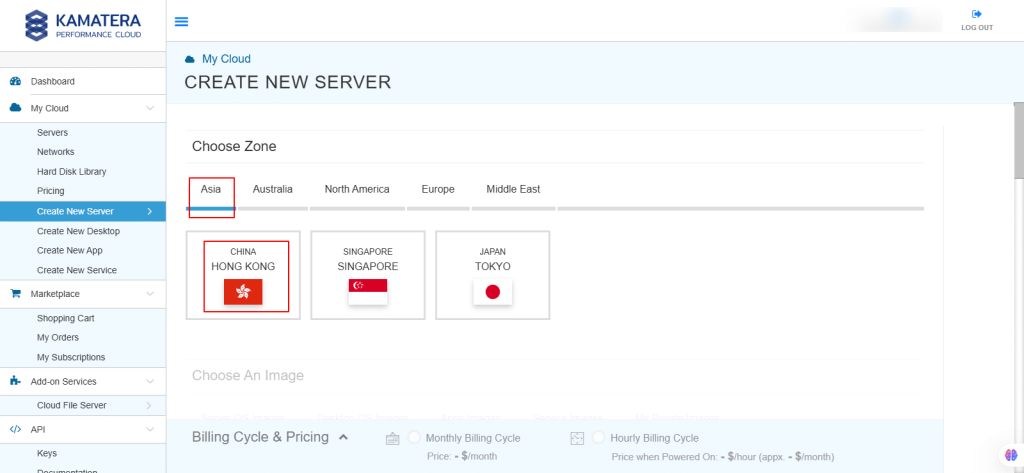
3. Choose the zone from the following options:
- Asia
- Australia
- North America
- Europe
- Middle East
Depending on the zone you select, the available countries will be displayed.
For this example, we used the Asia server domain to set up the Ubuntu Server.
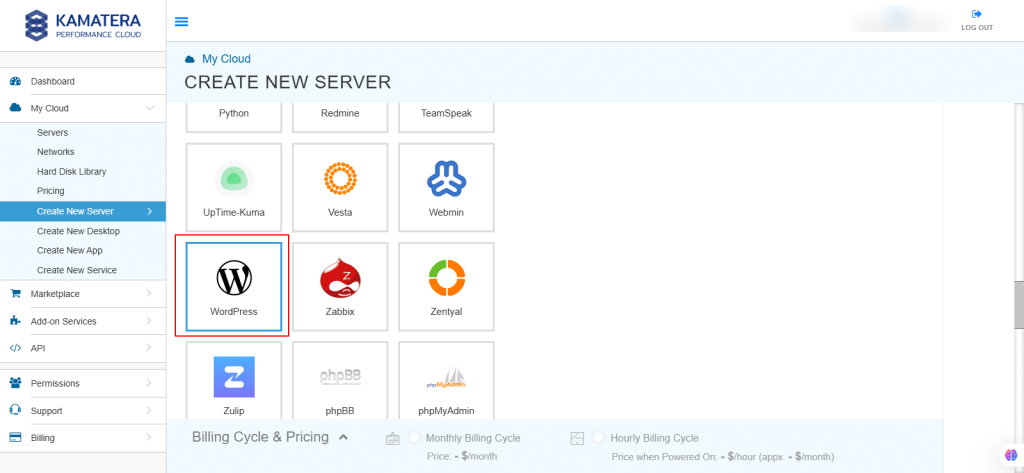
4. Kamatera offers a variety of apps and server images to help you set up preconfigured resources. You can explore the following options:
- Server OS Images
- Desktop OS Images
- App Images
- Service Images
- My Private Images
Choose Apps Images and select WordPress Server.
5. In Choose Version, select the latest version of WordPress.
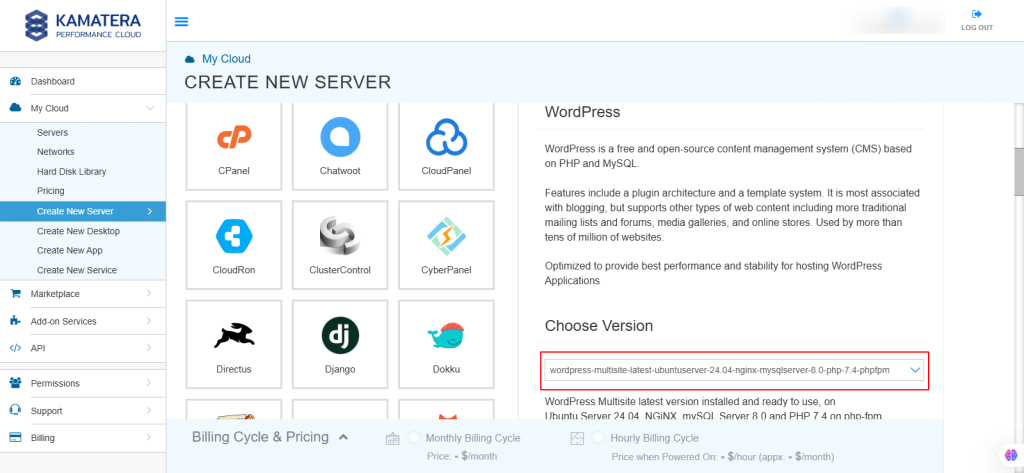
6. Upon selecting the version, toggle the Detailed view button to ‘on’ to view the detailed description, including the price.
Choose Server Specs.
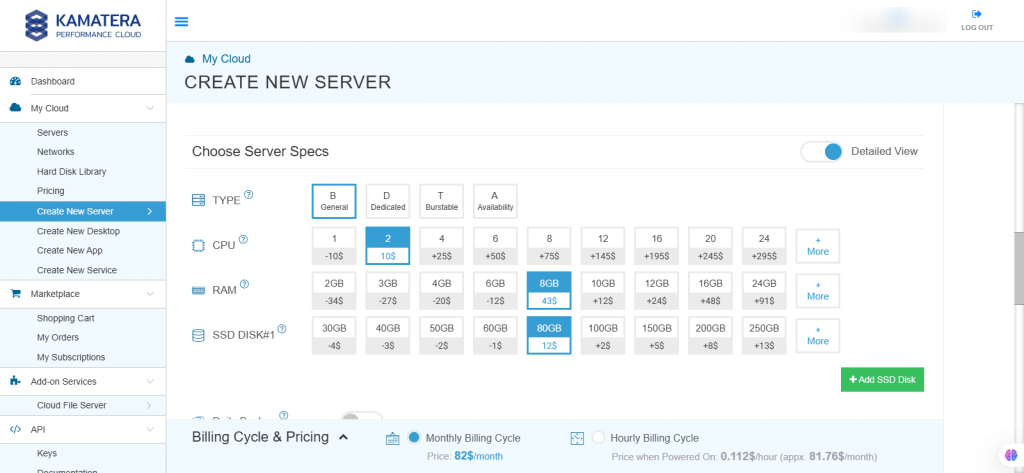
| Field | Description |
| Type | Type B-General Purpose: Server CPU are assigned to a dedicated physical CPU thread with reserved resources guaranteed.
Type D-Dedicated: Server CPU are assigned to a dedicated physical CPU Core (2 threads) with reserved resources guaranteed. Type T-Burst: Server CPU are assigned to a dedicated physical CPU thread with reserved resources guaranteed. Exceeding an average usage of 10% will be extra charged for CPUs usage consumption. Type A-Availability: Server CPUs are assigned to a non-dedicated physical CPU thread with no resources guaranteed. Note: More information on CPU types is available on the My Cloud- Pricing page. |
| CPU | Choose the number of vCPUs that will be installed on the server. Type B/T can be configured with up to 104 vCPUs per server. Based on Intel’s latest Xeon Processors, 2.7 GHz+. |
| RAM | Choose the amount of RAM that will be installed on the server. Type B/T/D can be configured with up to 512GB RAM per server. |
| SSD DISK | Choose SSD Storage Size. You can add up to 15 SSD Disk. SSD Storage includes unlimited IOPS and unlimited storage bandwidth, free of charge. |
| Daily Backup | Toggle the switch to enable extended daily backups of your server’s storage to external backup storage. |
| Managed Services | Toggle the switch to enable managed services to the server’s operating system by Kamatera’s technical support team. |
7. Choose Networking
Users can select a network, whether it’s a public Internet network or a private local network.
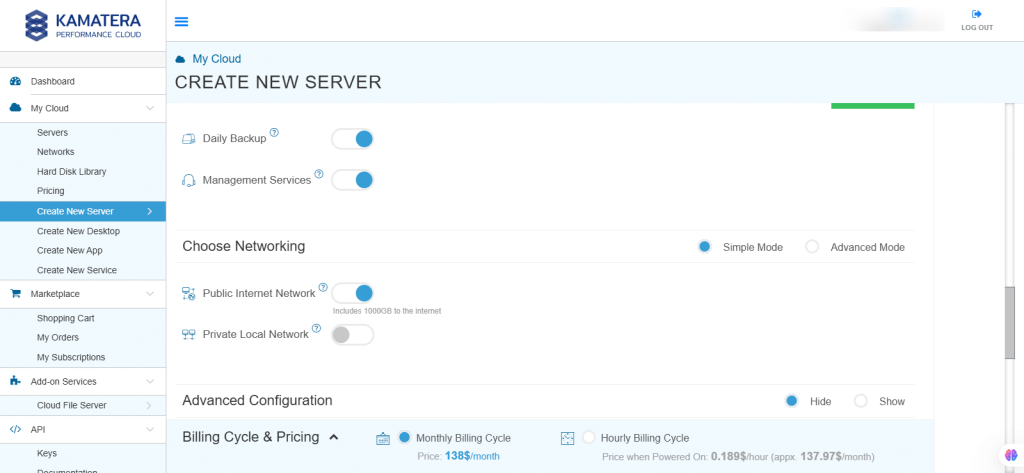
| Field | Description |
| Public Internet Network | Check to connect the server to a network interface connected to Public Internet Network. |
| Private Local Network | Check to connect the server to a network interface connected to Private Local Network. |
8. Advanced mode
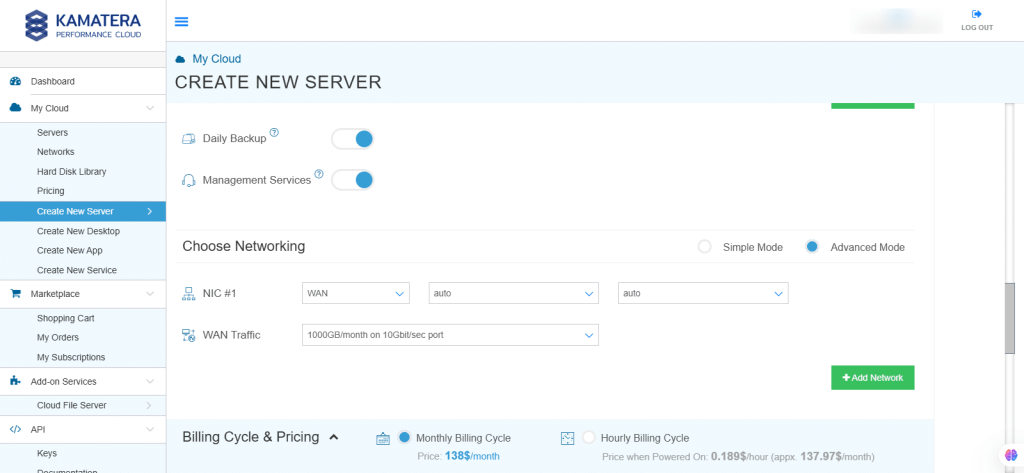
| Field | Description |
| NIC #1 | Select WAN from the options available in the drop-down menu.
Select auto from the options available in the drop-down menu.
Select auto from the options available in the drop-down menu.
|
| WAN Traffic | Select 5000 GB per month on 10 Gbit per second port. |
9. Advanced Configuration
Hide: If you want to hide the advanced configuration.
Show: If you want to see the advanced configuration.
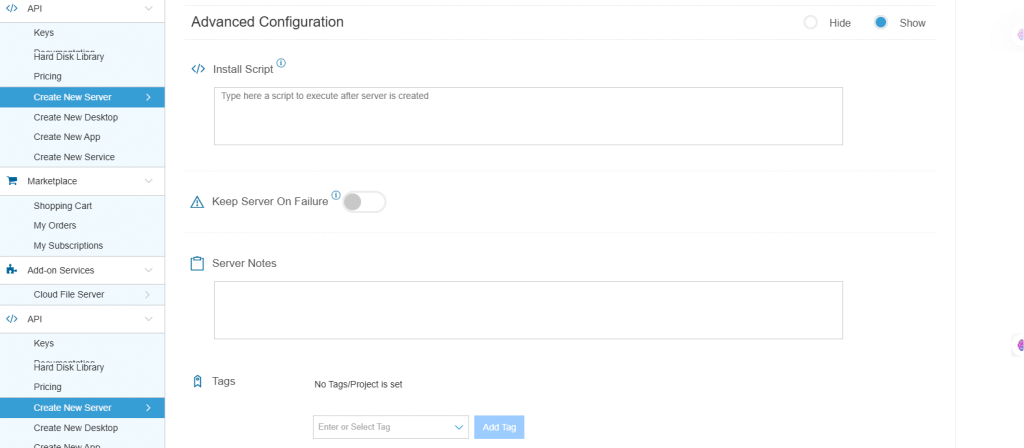
| Field | Description |
| Install Script | Enter the script here to execute, once the server is created.
Note: For Windows systems, use Power Shell. |
| Keep Server On Failure | Do not terminate server if start up script or provisioning fails. |
| Server Notes | Enter any server notes to be noted. |
| Tags | Select the Tags from the drop-down menu and click Add. |
10. Finalize Settings
Finalize settings by setting the password, re-validating it, selecting the number of servers, specifying the server name, and enabling the Power On Servers option.
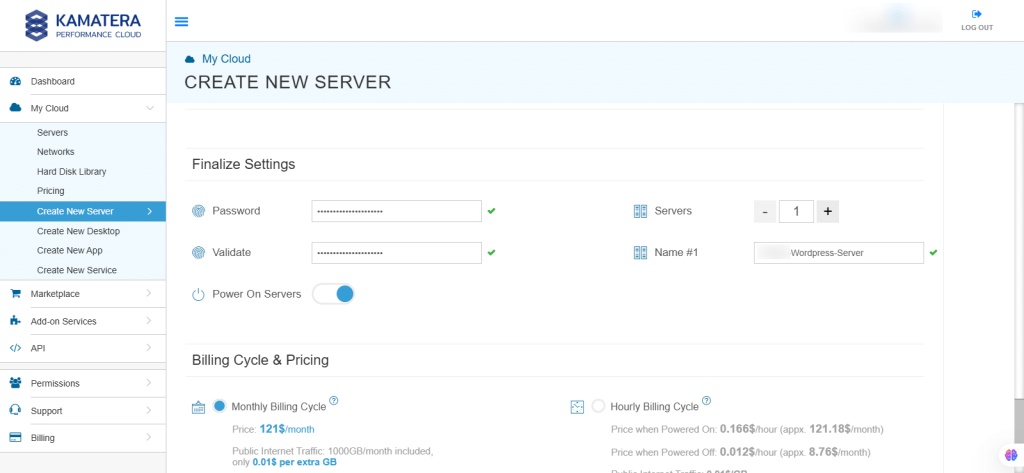
| Field | Description |
| Password | Select password
Password allowed characters: a-z, A-Z,0-9 !@#$^&*()~ and must fulfill the following requirements:
|
| Validate | Re-enter the password to validate. |
| Servers | Select the number of servers the user wants. |
| Name # 1 | Enter the name of the server. |
| Power On Servers | Switch on the toggle button to see the details |
11. Billing Cycle and Pricing
The user can choose between the monthly or hourly billing cycle.
Note: The Server Summary displays the location, operating system (including server specifications), add-on services, servers, and pricing.
Click Create Server.
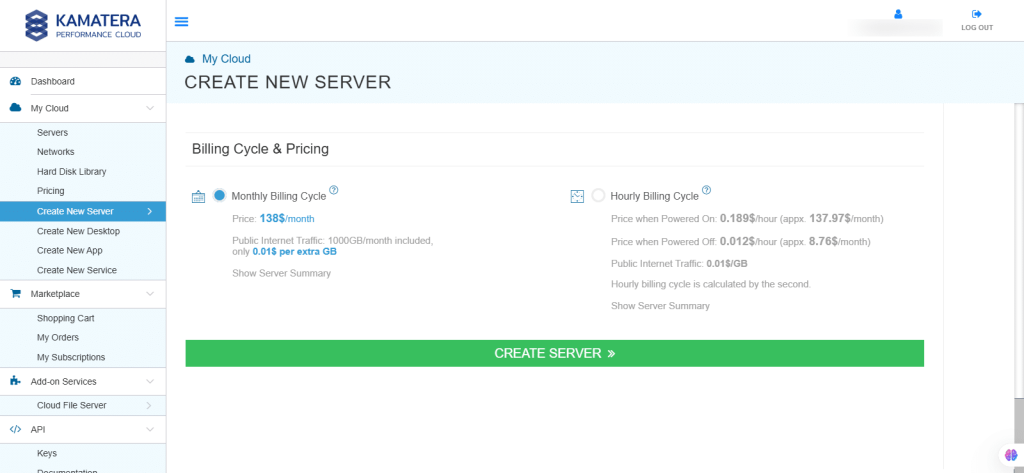
12. The server is added to the Tasks Queue. Once the server is created successfully, click on Open beside the server’s name.
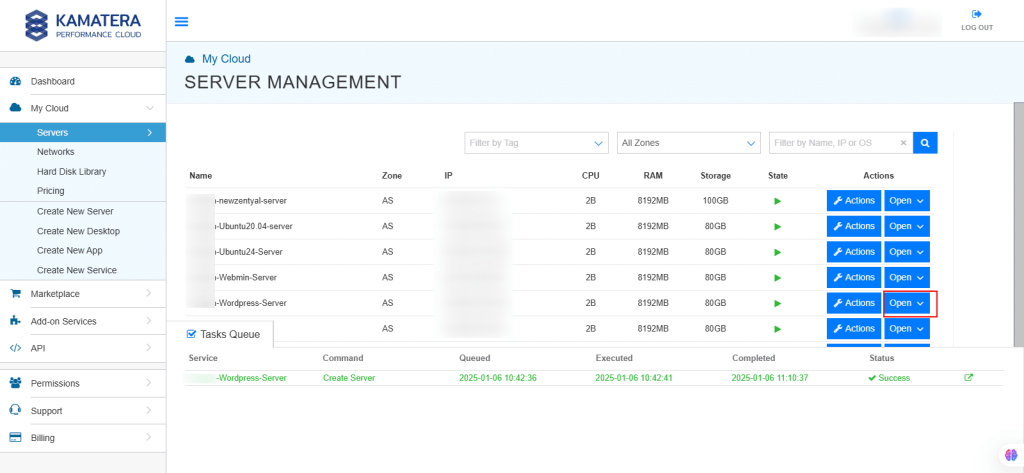
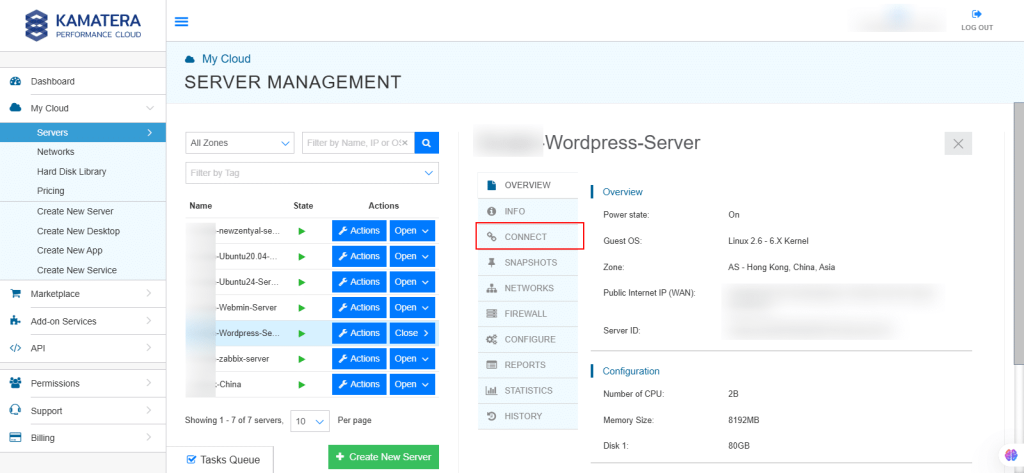
13. On the right, you can see the overview of the server. Click on Connect.
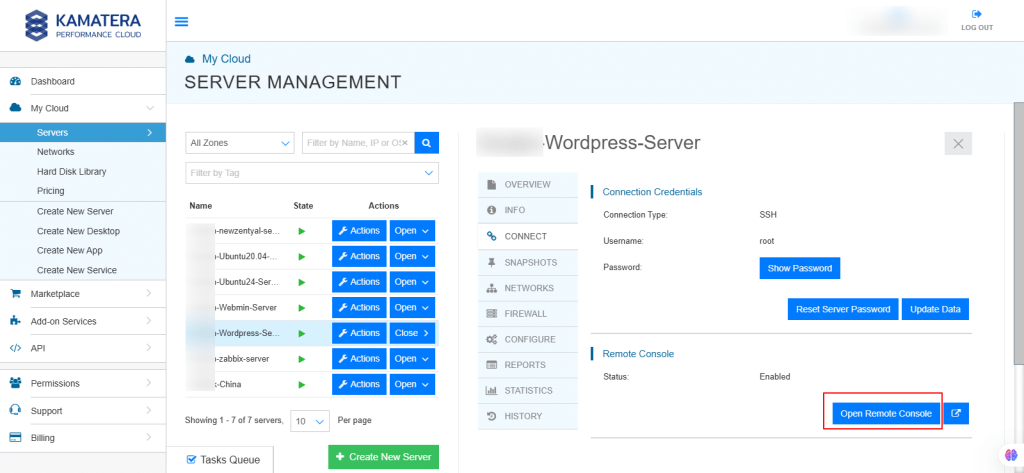
14. Connection credentials like Username and Password are displayed. Under Remote Console, click Open Remote Console.
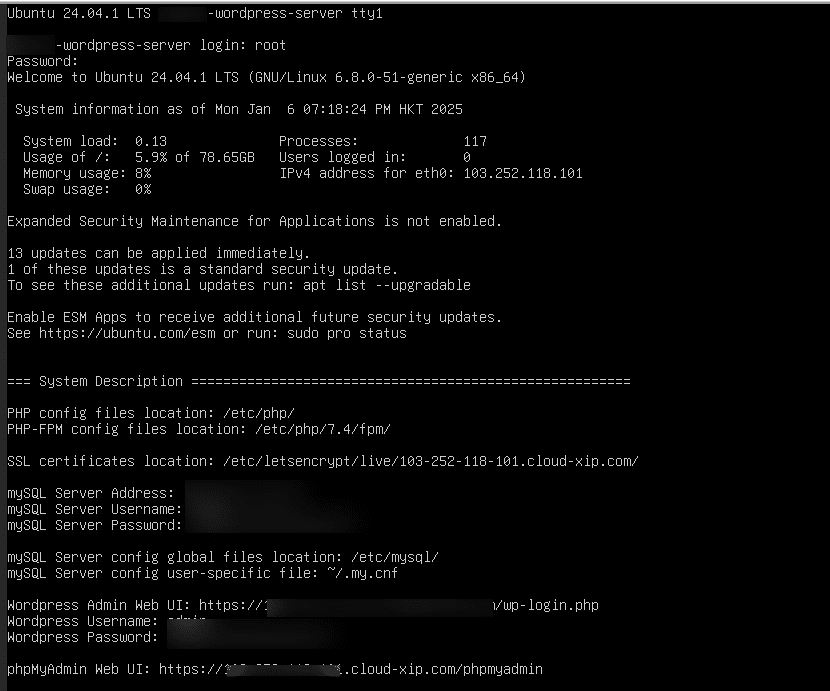
15. You will be redirected to the terminal. Rnter your login credentials which you set up during the WordPress server installation. Once logged in, you will see mySQL Server Address, Username, and Password.
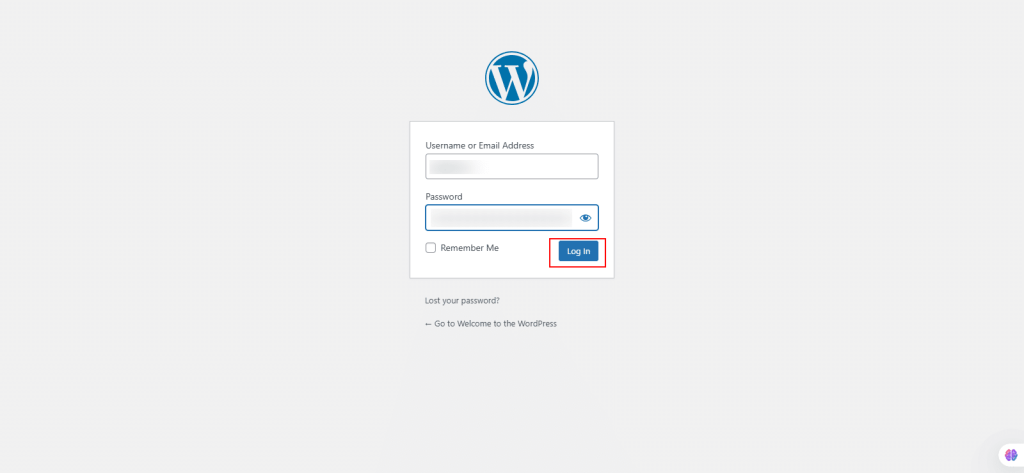
16. Navigate to the browser and enter WordPress Admin Web UI (mentioned in step-15).
Below is the WordPress login screen. After entering your username and password, click Log In.
Configuring WordPress
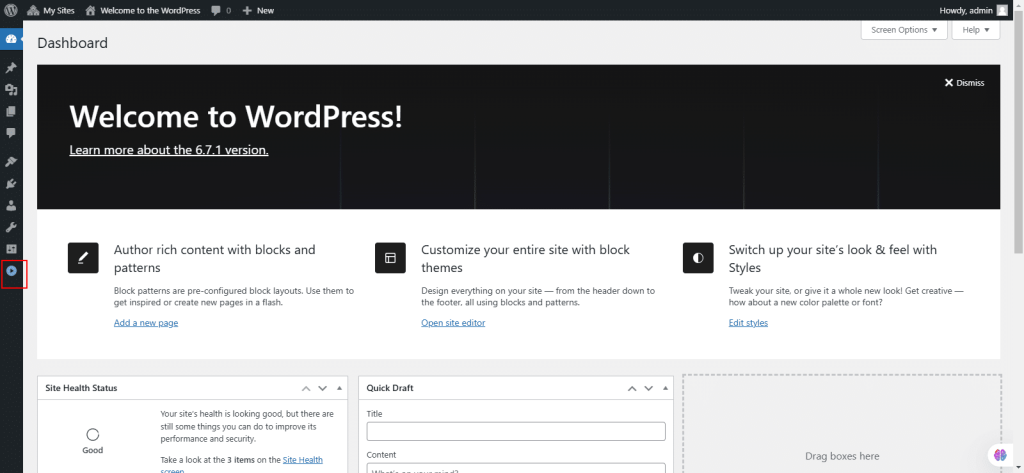
17. The screen below is the WordPress dashboard. It is the central place where you can manage and monitor the website. It gives you a quick overview of the site. You can access various tools and widgets for managing your site.
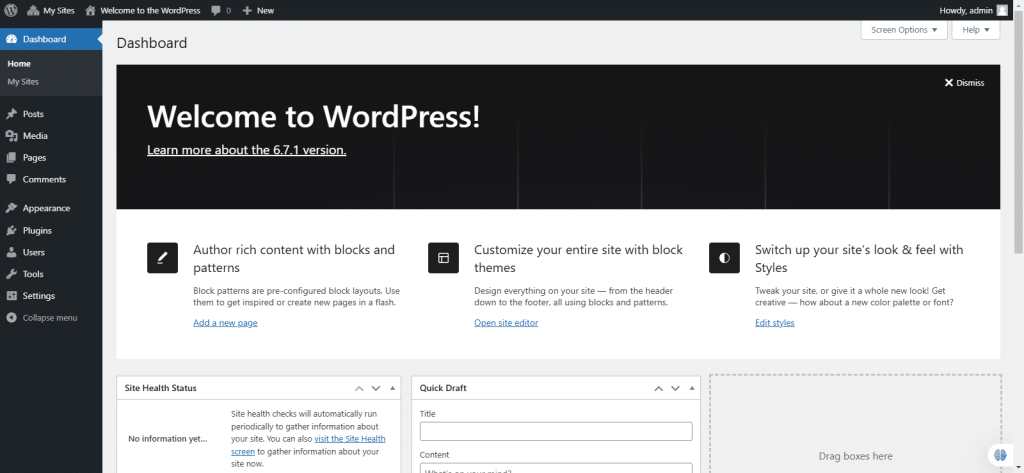
18. There are several widgets in the WordPress dashboard:
- Click a Widget’s title bar to expand or collapse its content.
- Quick Draft: The Quick draft widget enables users to draft new posts quickly by entering a title and content. These posts can be saved as drafts or published immediately.
- Drag boxes here: Drag-and-drop functionality to move widgets to preferred locations.
- At a Glance: It displays all the pages, posts, and comments as clickable links so that they can be easily navigated. It also shows the current version of WordPress and the active theme.
- Activity: It displays upcoming scheduled posts and recently published comments. It also displays comments with options to edit, delete, reply, mark as spam directly from the widget.
- WordPress Events and News: It lists all the WordPress events and official announcements from WordPress including community news and security updates.
- Adding New Widgets:
- Custom Widgets: Developers can add new widgets through plugins or by writing custom code in the functions.php file of a theme.
- API Reference: For more details, consult the Dashboard Widgets API.
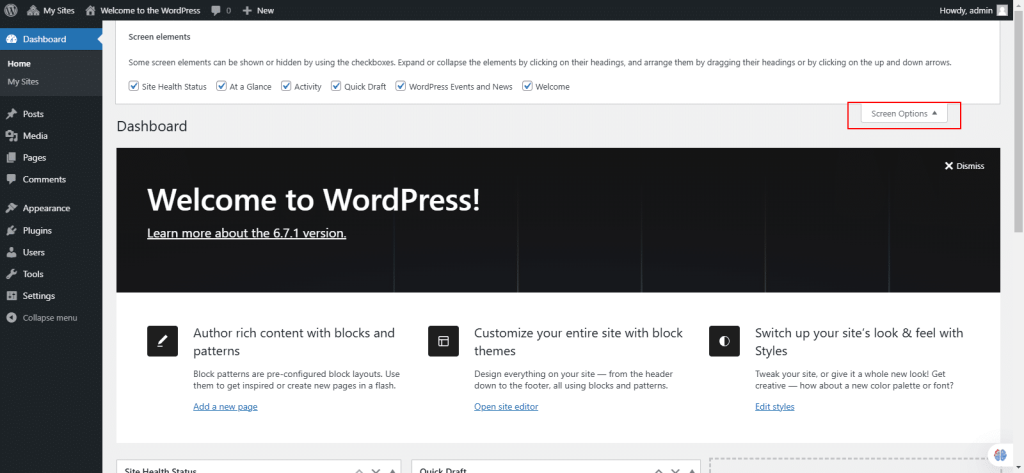
19. Click on Screen Options on the top-right corner of the screen, to control which widgets are displayed on the Dashboard.
- Check or uncheck boxes to show or hide widgets.
- Close the panel by clicking the same tab again.
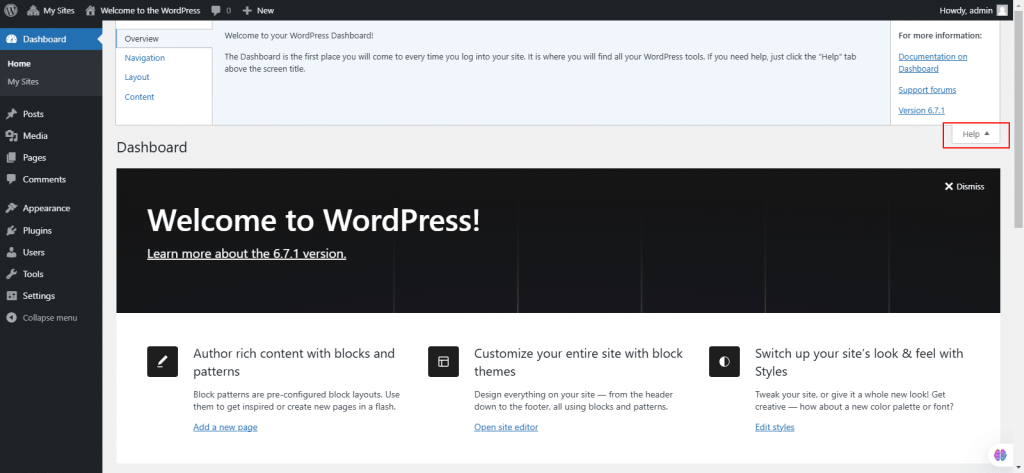
20. Click Help for more information.
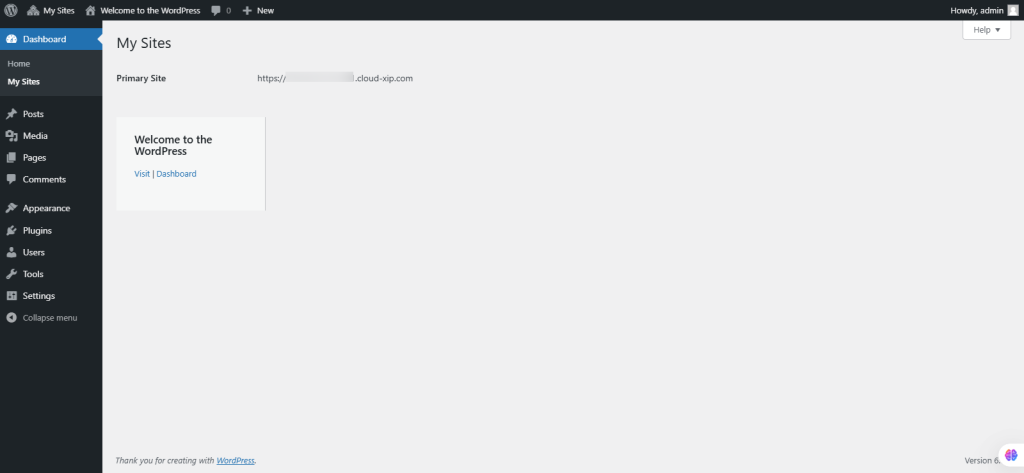
21. From the left navigation menu, under Dashboard, click on My Sites. This will display the primary site you are using.
22. From the left navigation menu, select Posts.
It is a powerful interface for managing all the posts on your blog.
All Posts:
- You will see a table lists all your posts and the newer post is listed first. The Posts table includes checkboxes for bulk actions, Title (with post status), Author, Categories, Tags, comment bubble (with comment count), and Date (published, modified, or scheduled); the Post ID is visible by hovering over the Title.
- Sortable Columns: Click on column headings like Title, Author, or Date to sort posts in ascending or descending order.
- View Options: Choose between List View (default, shows only titles) or Excerpt View (displays post excerpts below titles).
- Page Navigation: Navigate pages using arrows or set posts per page in Screen Options.
- Screen Options: Show/hide columns in the table and set the number of posts per page.
- Search: Use the search box to find posts by keywords.
- Filtering: Use links (e.g., All, Published, Drafts) or dropdowns (e.g., Date, Category) to filter displayed posts. Click Filter to apply selections.
The Selection, Actions, and Apply features in WordPress allow you to manage posts efficiently:
- Selection: Choose posts for bulk actions by checking their respective boxes.
- Actions:
- Bulk Actions: Edit or Delete multiple posts at once via the Bulk Actions dropdown. Bulk Edit allows changes to Author, Comments, Status, Pings, Sticky, and adding Categories/Tags (but not changing/removing them).
- Immediate Actions: Edit an individual post using “Edit” or “Quick Edit” options to update details like Title, Slug, Author, Date, and more.
- Apply: Executes the selected Bulk Action on the chosen posts.
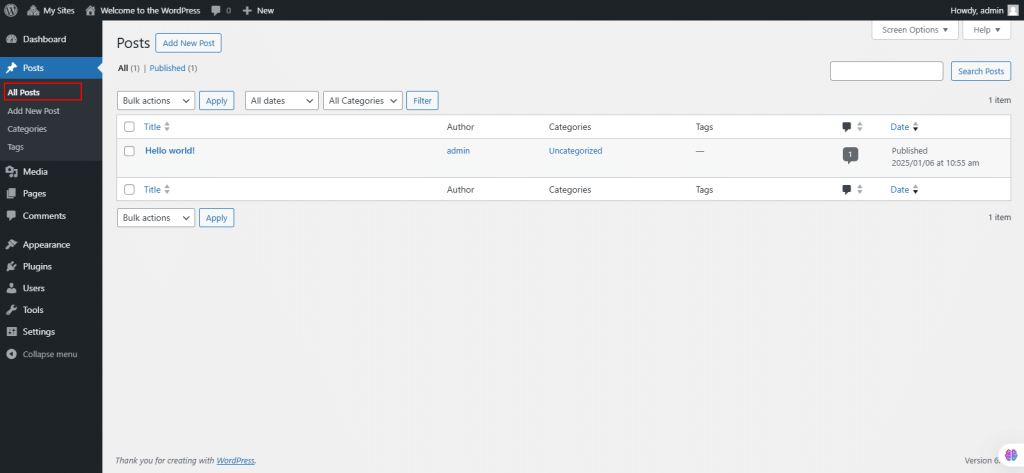
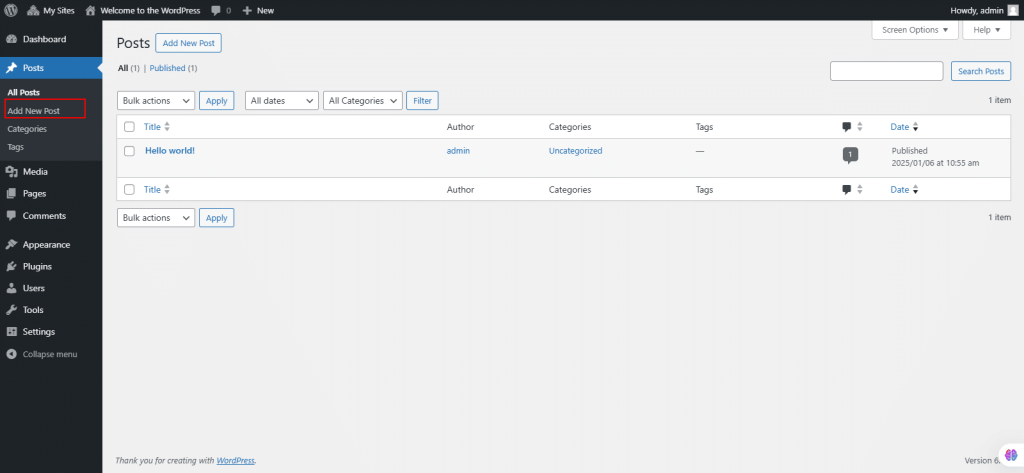
23. Under Posts, select Add New Post:
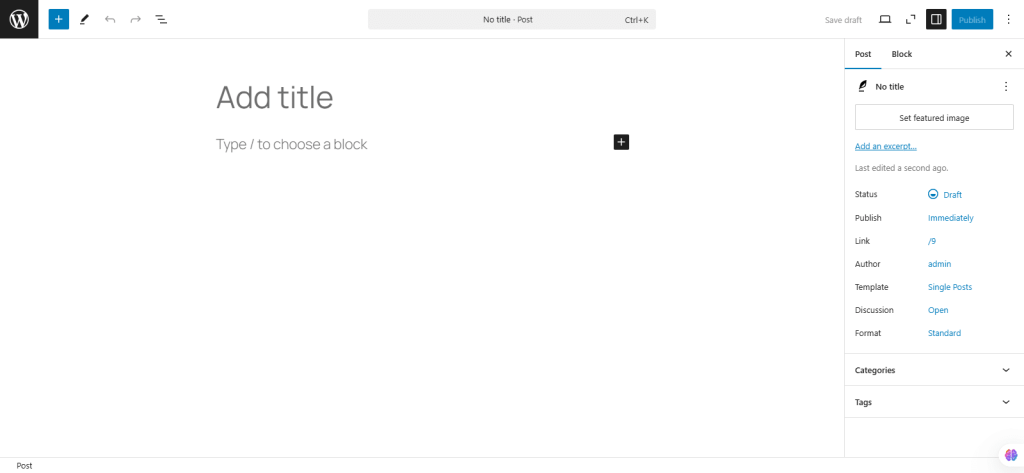
24. You will be redirected to the page shown below. Here, you can create a new post using the features.
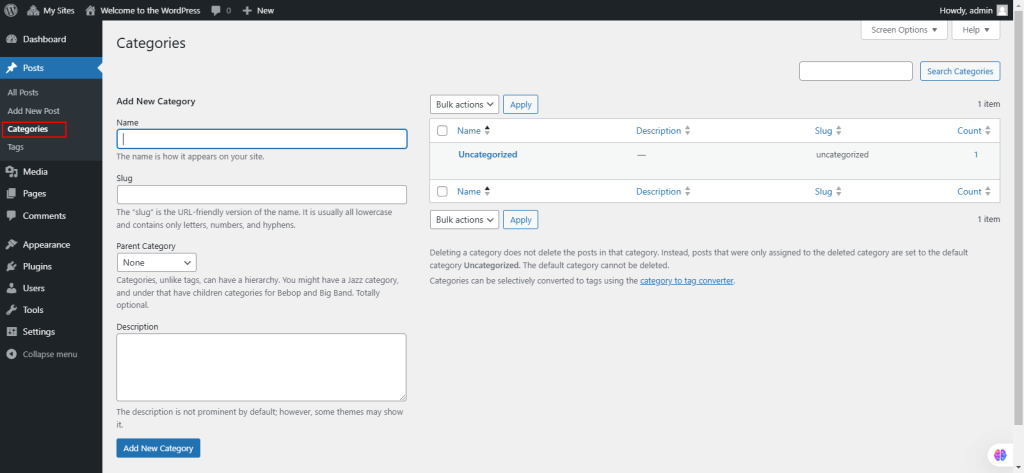
25. Under Posts, select Categories.
All the posts are grouped into categories to aid navigation. Each category must have a unique name. Categories can be hierarchical, with parent-child relationships.
- Add New Category: Enter the category name, slug (URL-friendly version), parent (if applicable), and description (optional). Save by clicking Add New Category.
- Category Table: It lists all categories hierarchically displaying Name, Description, Slug, and the number of Posts in each category. Categories are selectable for bulk actions (like delete).
- Screen Options: Customize which columns are shown in the table and adjust the number of categories displayed.
- Search & Filters: Search for categories or filter by date or parent category.Actions:
- Immediate Actions: Edit, Quick Edit, Delete, and View for individual categories.
- Bulk Actions: Apply actions (like Delete) to selected categories.
- Quick Edit: Modify category name, slug, and parent. Use “Update Category” to save.
- Edit Category: Modify details like name, slug, parent, and description. Use Update to save changes.
- Apply: Executes the selected Bulk Action on the chosen categories.
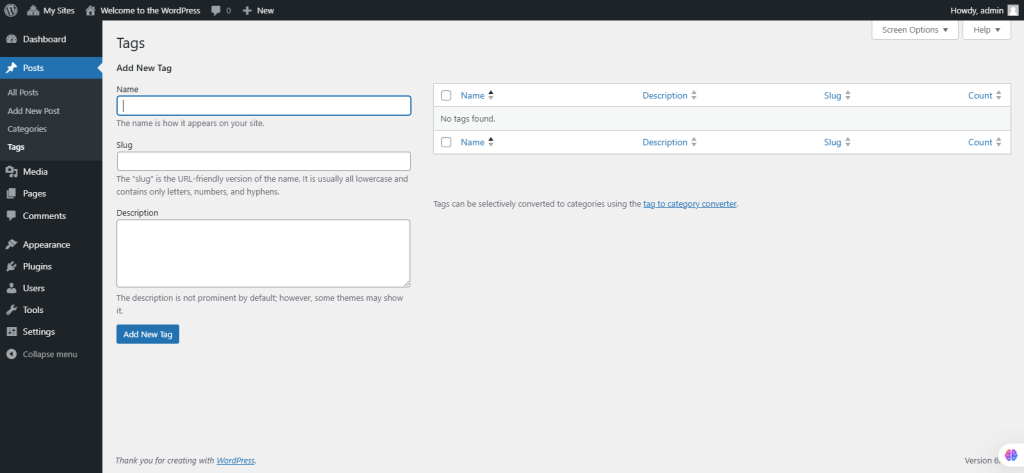
26. Under the Posts section, select Tags.
Tags will help in organizing content without a hierarchy. The Tags screen in WordPress allows you to create, manage, and edit tags for your posts.
- Add new tag: Create a new tag by specifying its name, description, and slug. After entering all the details click Add New Tag.
- Table of tags: Lists all tags, with details like Name, Slug, Description, and Post Count. You can manage tags here.
- Popular tags: Displays the most frequently used tags with the option to edit them.Actions:
- Selection: Select one or more tags to apply bulk actions (e.g., Delete).
- Quick edit: Allows for fast updates like changing the name and slug.
- Edit tag: Provides a detailed screen to modify the tag’s name, slug, and description.
- Screen options & search:
Customize which columns appear and search for specific tags.
27. From the left navigation menu, select Media.
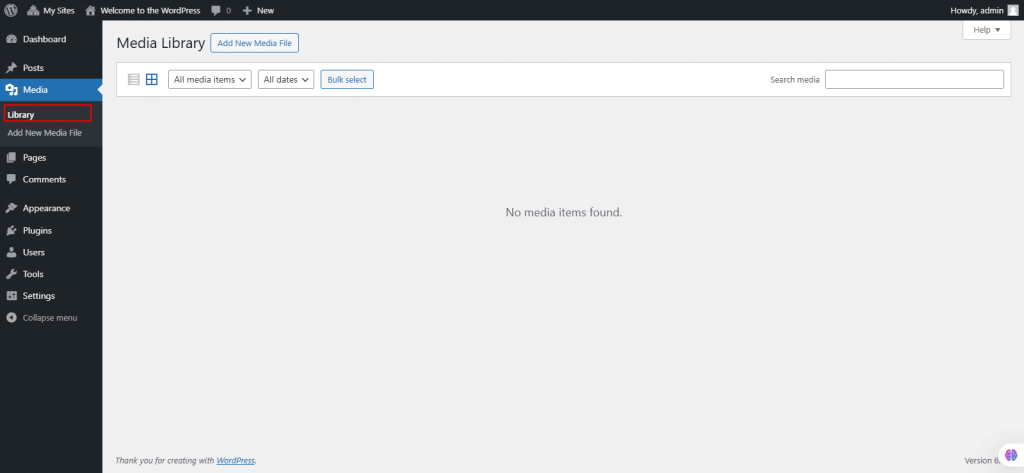
Under Media, select Library.
The Media Library screen allows you to manage the media like images, videos, audio, and files uploaded to your blog. You can add, view, edit, and delete media.
It offers two views, that is Grid View (with thumbnails) and List View (with a table of media).
- Grid View: In Grid view, the media is displayed as thumbnails with options to filter by type that is images, audio, video and date.
- List View: Here, the media is displayed in a table with columns like File, Author, Upload date, and more. You can sort by column and apply filters.
- Bulk Actions: Allows selecting multiple media items for actions like deletion.
- Attachment Details: Shows info such as file name, type, size, and allows for editing media details or deleting items.
- Search: Find media by entering keywords.
- You can attach media to Posts or Pages, and Bulk Actions help you manage multiple items at once (e.g., delete or move). The Apply button executes actions after selecting media.
28. Under Media, select Add New Media File.
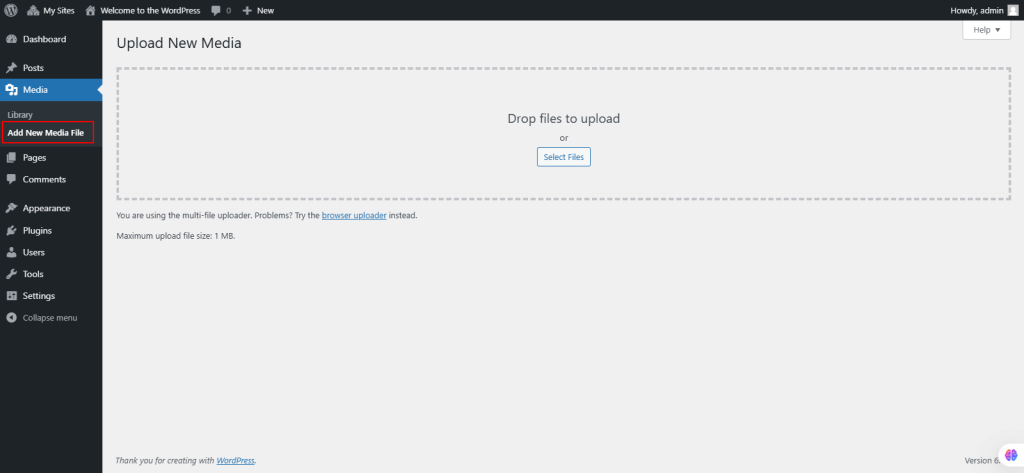
It allows you to upload media files like images, videos, etc., to the Media Library for use in posts and pages. So, there are two upload methods:
- Multi-File Uploader:
- Drag and drop the files into the upload area to add them (or)
- Click the Select Files button to browse and select files from your computer. You can upload multiple files at once.
- A progress bar shows upload status.
- Browser Uploader: Click Browse to select a file and then click Upload to add it to the Media Library. You can cancel the upload if needed.
Once the files are uploaded, you can edit the media or copy its URL to the clipboard. The maximum file size is shown at the bottom, depending on your hosting settings.
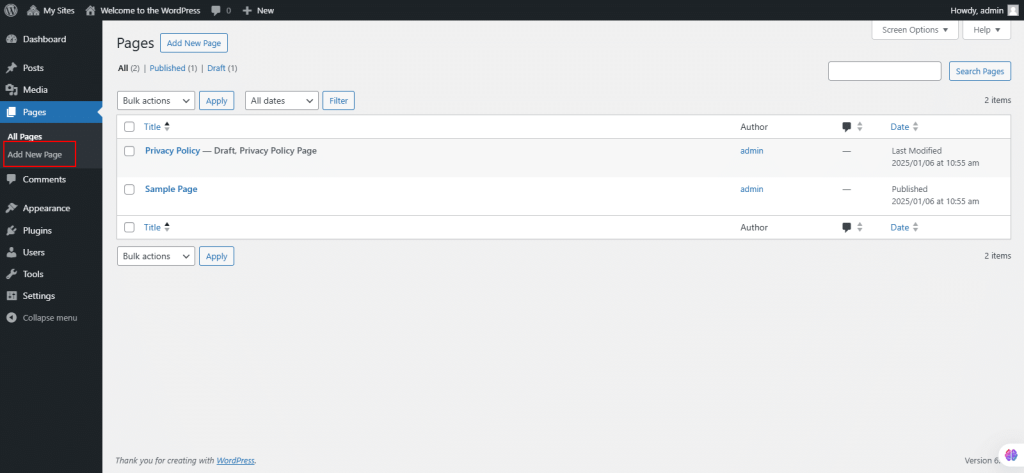
29. From the left navigation menu, select Pages.
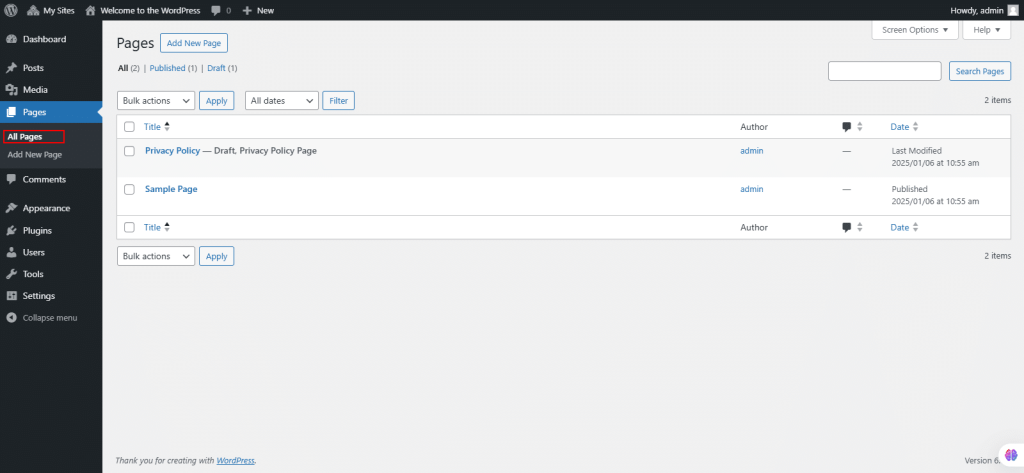
In WordPress, the Pages Screen enables you to manage all the pages including editing, deleting, and viewing them.
Under Pages, select All Pages.
- It displays a list of all Pages with columns for Title, Author, Comments, Date, etc. You can sort by Title, Author, or Date.
- Filtering: Allows you to view Pages by status (Published, Draft, etc.) or date.
- Bulk Actions: Select multiple Pages and apply actions like Edit or Delete. Bulk Edit allows changes to fields like Author, Status, and Comments for selected Pages.
- Quick Edit: Makes quick in-line changes to a single Page, such as Title, Slug, and Author.
- Search: Allows searching Pages by keywords.
- Screen Options: It allows you to customize displayed columns.
- Apply: It executes selected actions on the Pages.
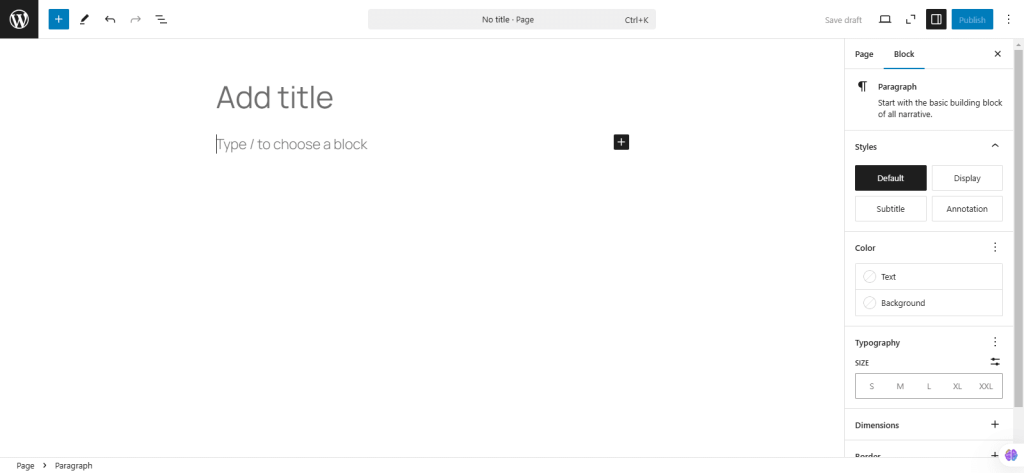
30. Click on Add New Page to add a new page.
31. You will be redirected to a new page where you can create a new page by using the features as shown in the screen below.
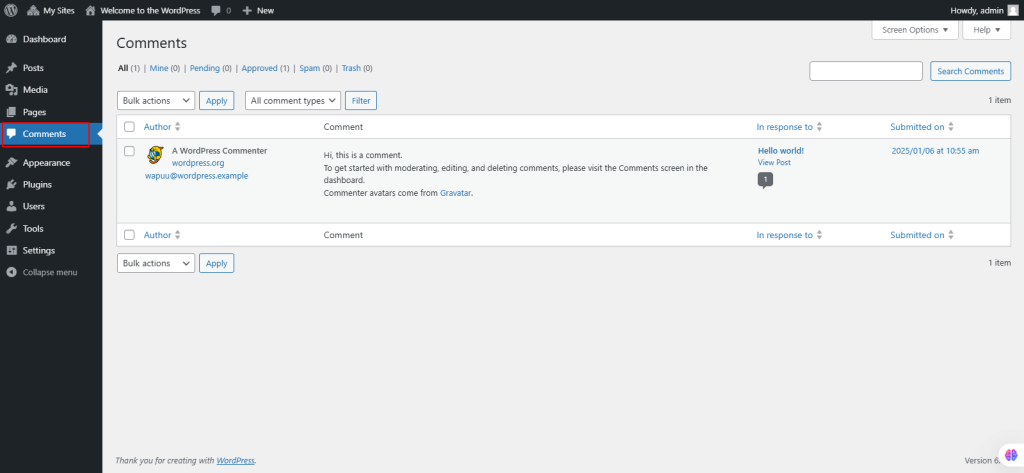
32. From the left navigation menu, select Comments.
In WordPress, the Comments Section allows you to manage all comments on your posts. Here, you can
- Edit, delete, mark as spam, or reply to comments.
- Bulk Actions: Approve/unapprove, mark as spam, or move to trash for multiple comments at once.
- Immediate Actions: Approve/unapprove, reply, quick edit, edit, mark as spam, or trash comments individually.
- Search & Filter: Search comments by keywords, filter by status (All, Pending, Approved, Spam, Trash), or filter by comment type (comments or pings).
- Quick Edit: Change commenter’s name, email, URL, or content inline.
- Spam & Trash: Manage spam comments and restore or permanently delete trashed comments.
Once a comment is edited, a new screen is displayed where it allows the user to
- Modify the comment’s content, author details, and status (approved, pending, or spam).
- Save changes or move the comment to trash.
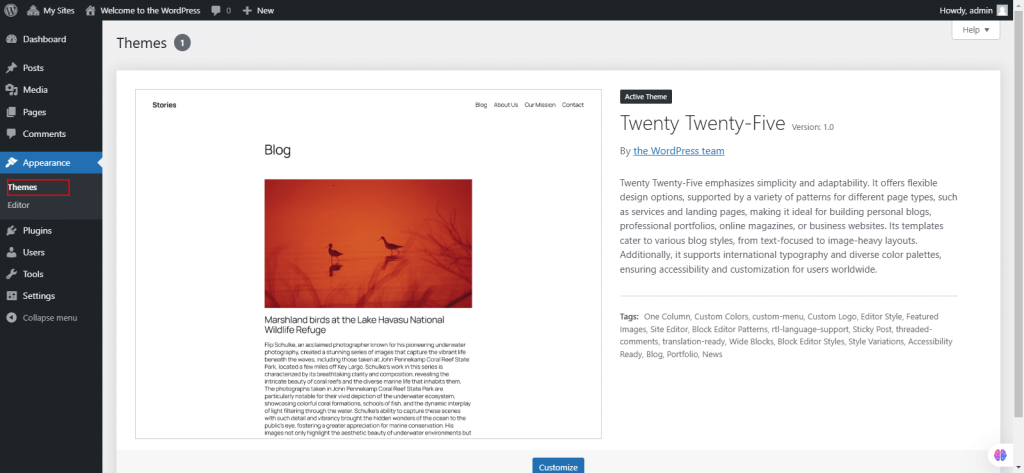
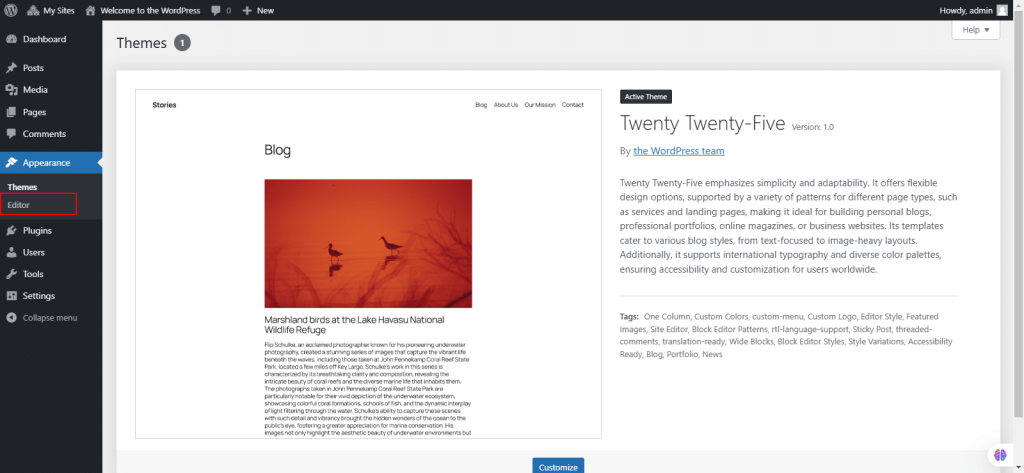
33. From the left navigation menu, select Appearance.
Under Appearances, select Themes.
- Managing Themes:
- Current Theme: The active theme appears first, with details such as theme name, version, and a description available when clicking on Theme Details.
- Theme Update: If an update is available, a message will show prompting you to either view details or update the theme.
- Available Themes: Displays installed themes, allowing you to activate, preview, or delete them. Pagination is available if there are more than 15 themes.
- Installing Themes:
- Automated Theme Installer:
Navigate to Appearance > Themes, then click Add New.
You can search themes by filter (Featured, Popular, Latest), keyword, or attribute.
Preview and install themes and activate them once installed.
- Upload Method:
This method installs a theme in a ZIP file format. Go to Appearance > Themes, click Add New, then Upload Theme, and select the ZIP file.
- FTP Method:
Upload theme files to the /wp-content/themes directory on the server using an FTP client. Activate the theme in the WordPress dashboard after uploading.
- cPanel Method:
In cPanel, upload the ZIP file to the themes directory, extract it, then activate it through the WordPress dashboard.
Each method offers flexibility, depending on where the theme is sourced from and how you prefer to manage installations.
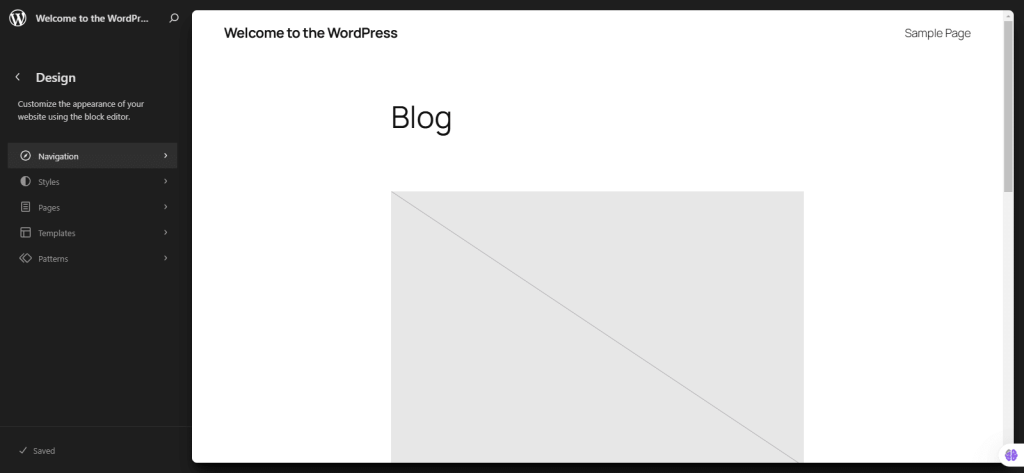
34. Under Appearance, select Editor.
35. You will be redirected to a new page, where you can edit.
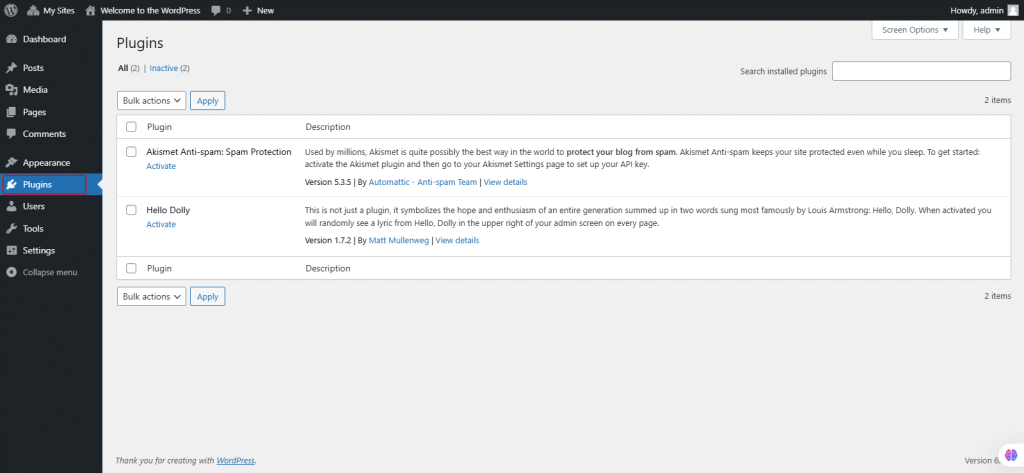
36. From the left navigation menu, select Plugins.
This screen allows you to manage your Plugins by activating/deactivating, deleting, updating, and editing the plugins that are installed.
- Plugin List: Displays all installed plugins, organized alphabetically, with columns for plugin name, description, version, and author info.
- Page Navigation: Move between pages of plugins, with options to jump to the first/last or go forward/back.
- Screen Options: Customize which columns are visible and set the number of plugins per page.
- Search & Filtering: Find specific plugins and filter by active, inactive, or update-required plugins.
- Bulk Actions: Select multiple plugins to perform actions like activation, deactivation, update, or deletion.
- Immediate Actions: Perform individual actions on plugins such as activating, deactivating, editing, or deleting.
- Apply: After selecting plugins and an action, click “Apply” to execute the action.Plugin Actions:
- Activate: Turns on an inactive plugin.
- Deactivate: Turns off an active plugin.
- Delete: Removes inactive plugins and their files.
- Upgrade: Updates a plugin to the latest version.
- Edit: Allows editing of plugin code (use with caution).
- Deleting Plugins: Deletion asks for confirmation and lists files to be deleted. Errors during deletion must be investigated.
- Upgrading Plugins: Upgrade notices appear for plugins hosted on the WordPress Plugin Directory. For others, updates must be checked manually.
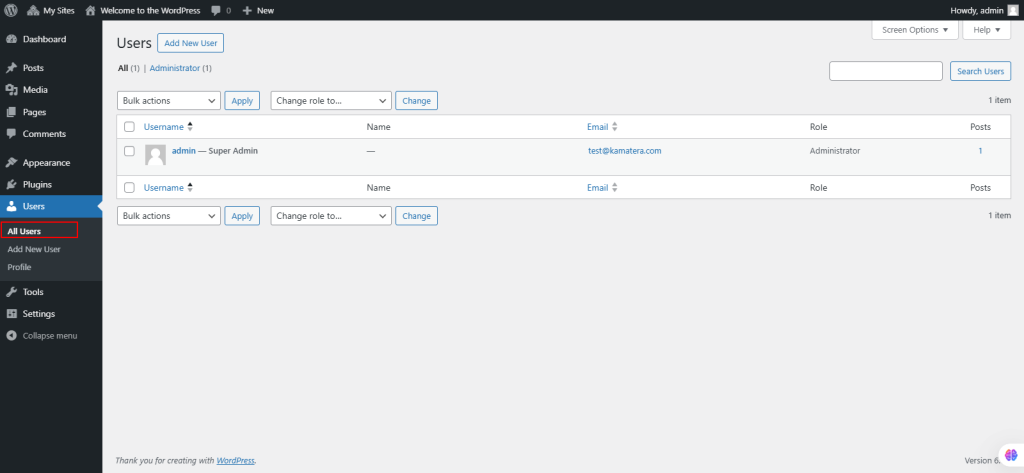
37. From the left navigation menu, select Users. Under Users, select All Users.
This screen allows you to add, delete and change your site’s users. You can search for users and make bulk changes and deletions to a selected group of users.
On the screen a table is displayed with the following columns:
- Check box: Select users for bulk actions like Delete or Change Role.
- User Image: Avatar of the user.
- Username: Click to edit the user or access their profile.
- Name: User’s first and last names.
- E-mail: User’s email address.
- Role: Assigned role, determining the user’s capabilities in WordPress.
- Posts: Number of posts by the user, with a link to view or edit them.
- Sorting and Navigation:
- Sortable columns: Click column headers (e.g., Username, Name, Email) to sort.
- Page navigation: Use arrows to navigate between pages if there are more than one.
- Screen Options:
Toggle columns like E-Mail, Role, and Posts to be displayed.
Search & Filter:
- Search: Enter a string to find users by Username, Name, Email, or Website.
- Filter: Links to view users by roles (e.g., Subscribers).
Bulk Actions:
- Selection: Select users individually or all at once (using checkboxes).
- Actions: Perform actions like Delete or Change Role on selected users.
- Apply: Execute selected actions.User Actions:
- Edit: Click on Username or Edit link to modify user details.
- Delete: Remove a user, with an option to delete or attribute their posts to another user.
- Change role to: Change the role of selected users.
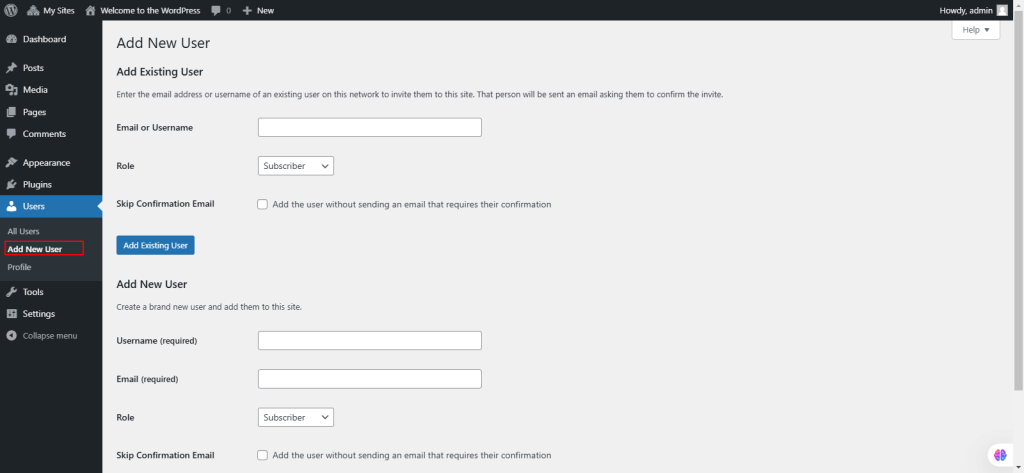
38. Under Users, select Add New User.
It allows you to manually create new users for your site.
- Username (required): The login name for the new user.
- E-mail (required): A unique email address for the user.
- First Name: User’s first name.
- Last Name: User’s last name (display name defaults to first and last name).
- Website: Optional URL for the user’s website.
- Password (twice): Enter the password twice, with a strength indicator for security.
- Send Password?: Option to send the password to the new user via email.
- Role: Select a role for the user from a drop-down list.
Click Add New User to save the user. A confirmation message will appear when successful.
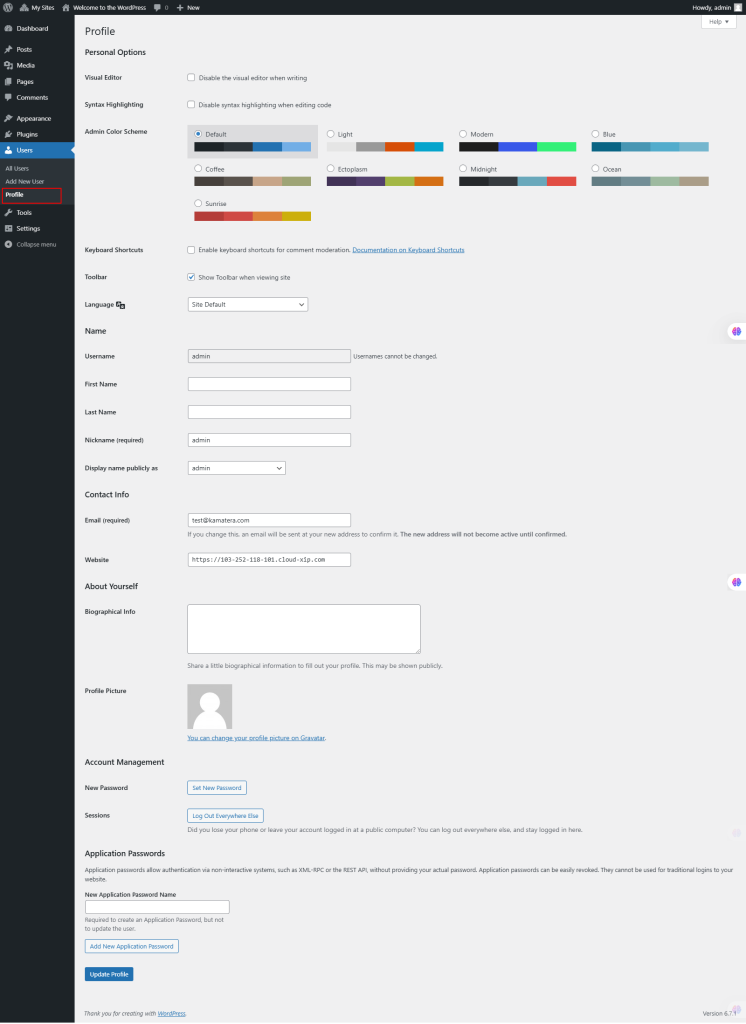
39. Under Users, select Profile.
It allows users to manage their personal information and preferences. Some of the key features include:
- Name: Enter your first name, last name, nickname, and choose how your name is displayed publicly.
- Contact Info: Add a unique email address (used for administrative purposes) and a website URL.
- Biographical Info: Add an optional short description or profile about yourself.
- Profile Picture: Linked to your Gravatar image.
- Personal Options: Customize preferences for visual editor, syntax highlighting, admin color scheme, keyboard shortcuts, toolbar display, and language selection.
- Account Management: Generate a new password, check password strength, and log out of other devices.
- Click Update Profile to save changes.
40. From the left navigation menu, select Tools.
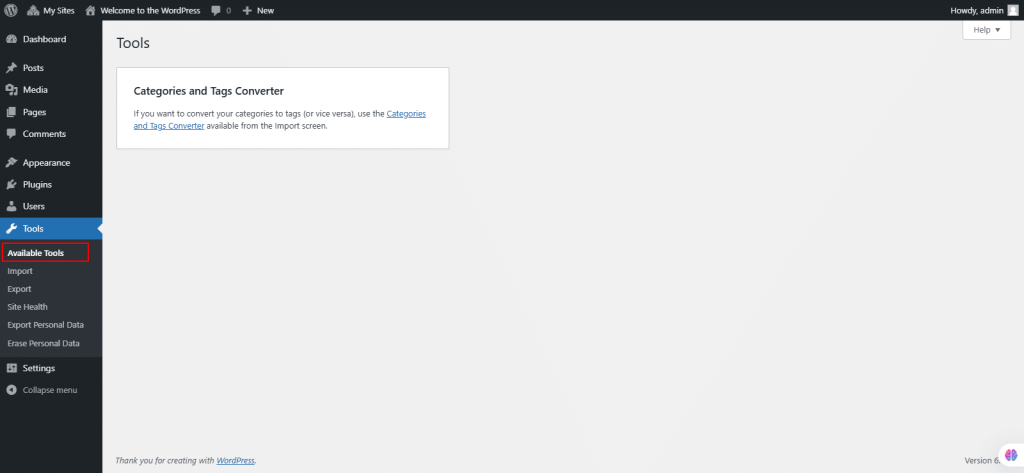
Under Tools, select Available Tools.
The Categories and Tags Converter tool allows you to convert categories to tags or vice versa. It redirects you to the Tools Import Screen to perform the conversion.
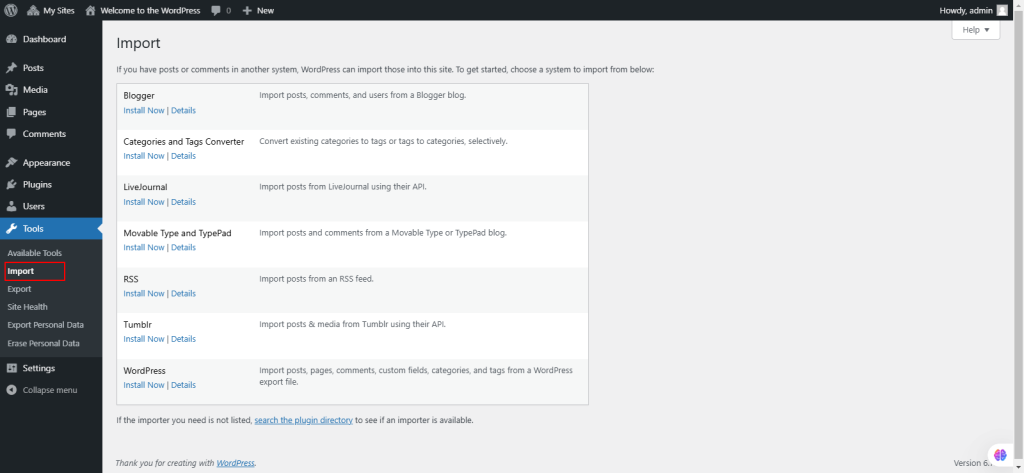
41. Under Tools, select Import.
The Tools Import screen allows you to import content from various platforms into your WordPress blog. You can import posts, comments, and other data from systems like Blogger, LiveJournal, Movable Type, TypePad, RSS, Tumblr, and other WordPress sites. It also includes an option to convert categories to tags and import links from OPML format.
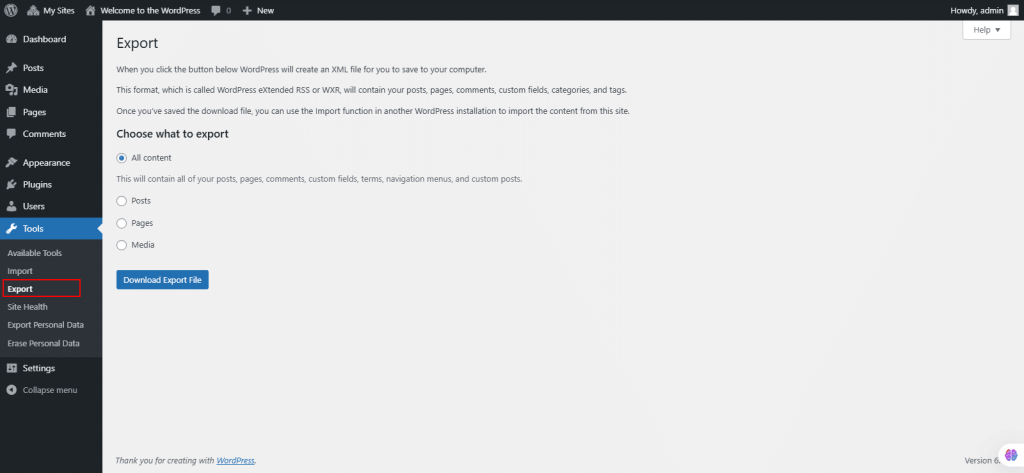
42. Under Tools, select Export.
The Tools Export screen in WordPress allows you to export site data such as posts, pages, custom post types, comments, categories, tags, and users as a WordPress Extended RSS (WXR) XML file. This file can be imported into another WordPress site using the Tools Import screen.
- All Content: Export everything.
- Posts/Pages: Apply filters like category, author, date range, and status before exporting.
- Click Download Export File to generate the export file with selected filters for download.
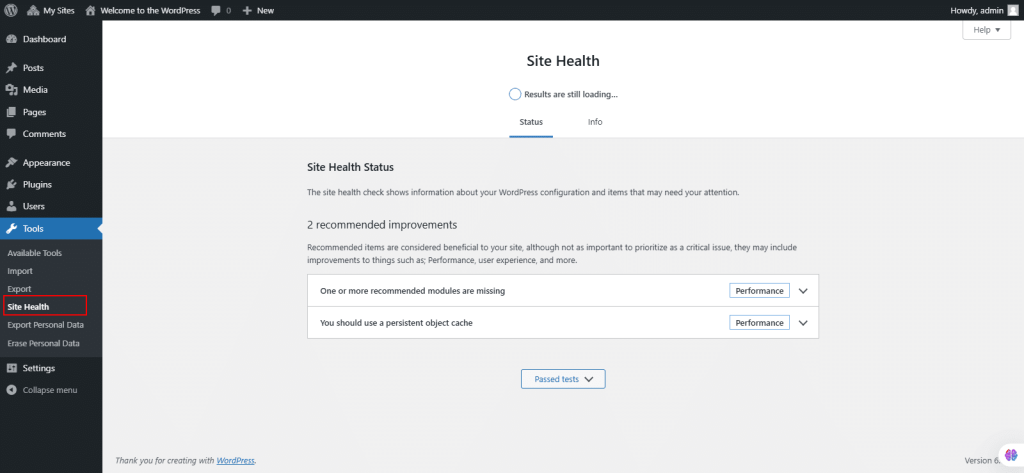
43. Under Tools, select Site Health.
The Site Health screen in WordPress provides diagnostics about your website’s configuration and performance. There are two primary tabs:
Status:
- Displays critical issues, recommended improvements, and passed tests.
- Highlights potential security vulnerabilities, performance problems, and necessary updates.
- Examples of critical issues include disabled auto-updates, outdated PHP versions, blocked HTTP requests, and debug settings exposing sensitive information.Info:
- Offers detailed technical insights into the site’s configuration.
- Includes information about WordPress, active/inactive themes and plugins, server setup, media handling, directories, database, permissions, and constants.
- Features an export option for copying all site details for troubleshooting.
Some of the key features include:
- WordPress: Shows version, language, URL, HTTPS status, and other environment settings.
- Directories and Sizes: Lists the locations and sizes of WordPress directories.
- Themes: Displays active and inactive themes with their details and auto-update status.
- Plugins: Provides similar details for active and inactive plugins.
- Media Handling: Highlights file upload capabilities and image processing settings.
- Server & Database: Includes PHP and database information for performance monitoring.
- Filesystem Permissions: Verifies file and directory access rights.
This tool ensures your WordPress site operates securely and efficiently by identifying issues and offering actionable insights.
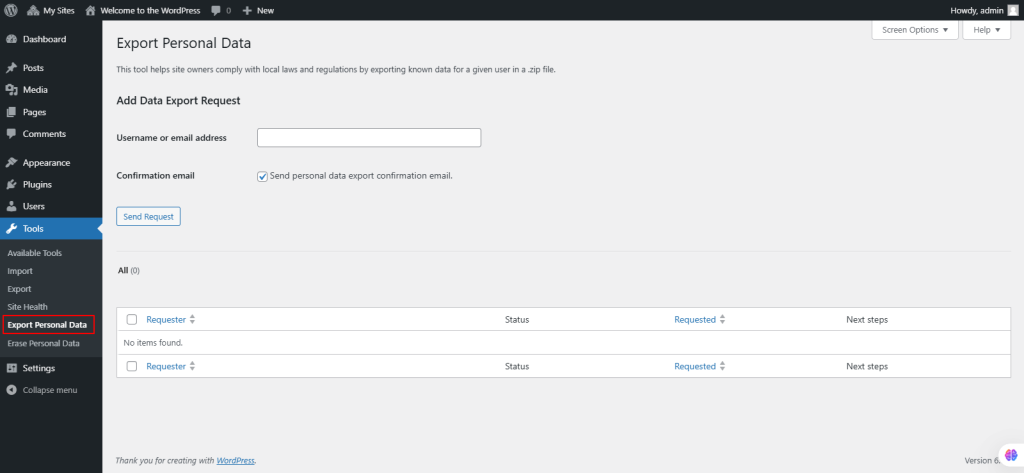
44. Under Tools, Select Export Personal Data.
Export Personal Data tool can generate a (.zip format) file containing the personal data which exists about a user within your WordPress site.
- Enter the user’s username or email and click Send Request.
- The request appears in the Requester Table with a status of Pending.
- The user receives a confirmation email to verify the request.
- Upon confirmation, the status changes to Confirmed.
- Click Email Data to send the export link to the user.
- The user receives a link to download their data, valid for 48 hours.
- After the user downloads the file, the request status changes to Completed, and the option to Remove Request appears.
Downloading and Managing Requests
- Download Personal Data: Admins can download the .zip file directly from the Requester Table, even for pending requests.
- Filtering Requests: Filter by Status (Pending, Confirmed, Completed) or by email.
- Resending Emails: Resend confirmation or export emails by selecting the request and using the Bulk Actions dropdown.
- Removing Requests: Remove completed requests using the Bulk Actions menu.
Exported Personal Data: The .zip file includes an index.html file with the following user data:
- Site Details: Information about the WordPress site.
- User Information: Account details.
- Comments: User comments and associated metadata.
- Media: Files uploaded by the user.
The tool only exports data from WordPress and participating plugins. Additional steps may be needed for full compliance with user data requests. The .zip download link is time-limited (48 hours). This tool simplifies user data export to enhance privacy compliance.
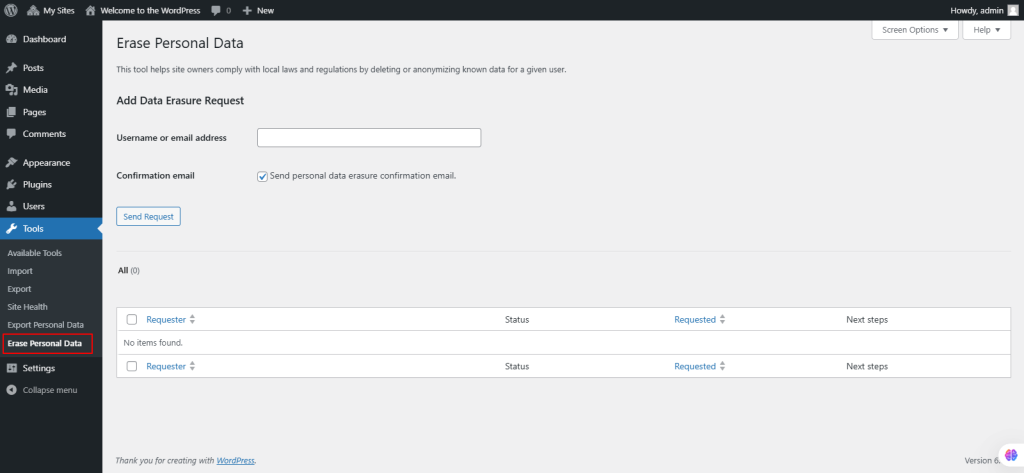
45. Under Tools, select Erase Personal Data.
This allows administrators to delete a user’s personal data permanently upon verified request. Once confirmed, the erased data is removed from the database and cannot be reversed. Erased data is not removed from backups or archives. Exercise caution when restoring site backups to ensure erasure requests are respected. This tool only handles data from WordPress and participating plugins. Additional steps may be required for full compliance with deleted requests.
-
- Enter the user’s username or email and click Send Request.
- The request will appear in the Requester Table with a status of Pending.
- The user receives an email titled Confirm Action: Erase Personal Data, containing a confirmation link.
- Once the user confirms via the link, the request status changes to Confirmed, and the Erase Personal Data button appears.
- Click Erase Personal Data to permanently delete the user’s data.
- The status updates to Completed, and the option to Remove Request becomes available.Forcing Erasure: Admins can force erasure of personal data without user confirmation:
- Hover over the requester’s email and click Force Erase Personal Data.
- This can be done even for pending requests.Filtering Requests: Filter requests by:
- Status (Pending, Confirmed, Completed, etc.).
- Requester’s email address by entering it in the search box.
- Resending Emails: Resend confirmation emails via the Bulk Actions dropdown by selecting the desired request(s) and clicking Apply.
- Removing Requests: Requests can be removed from the Requester Table without affecting user data. Use the Bulk Actions dropdown to remove requests.
- Erased Data: To view the data targeted for erasure, use the Export Personal Data tool first to generate a .zip file that outlines all data associated with the user.
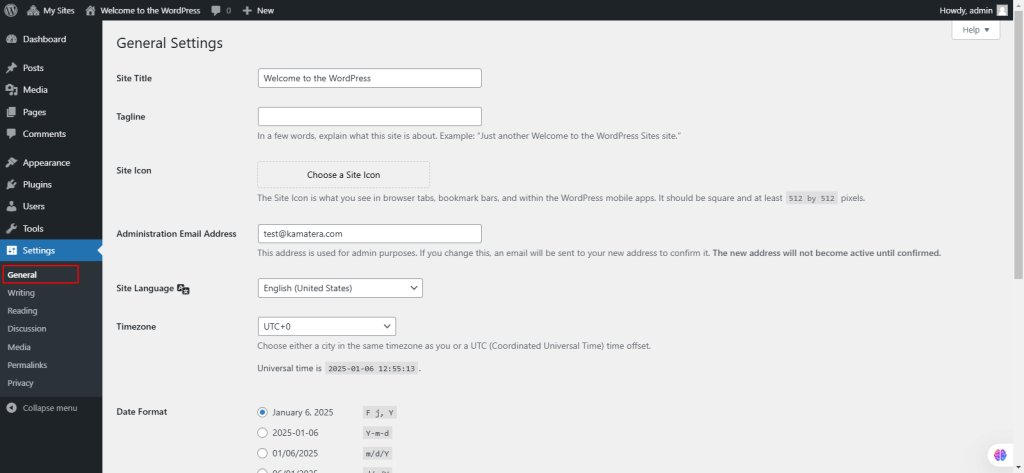
46. From the left navigation menu, select Settings.
Under Settings, select General.
The General Settings screen allows you to configure basic settings for your WordPress site, including its title, location, user roles, and time preferences.
- Site Title: Name of your site, displayed in themes and browser title bars.
- Tagline: A short slogan describing your site.
- WordPress Address (URL): URL of the directory containing WordPress core files.
- Site Address (URL): URL users type to access your site.
- Email Address: Admin email for notifications (e.g., user registrations, comment moderation).
- Membership: Enable or disable user registration.
- New User Default Role: Assign default roles (e.g., Subscriber, Author) to new users.
- Site Language: Set the language of the WordPress dashboard.
- Time zone: Select your local time zone.
- Date Format: Choose how dates are displayed on your site.
- Time Format: Choose how times are displayed on your site.
- Week Starts On: Set the first day of the week for calendars (default is Monday).
- Save Changes: Save and confirm updates to your settings.
These settings control essential configurations for site behavior, user access, and time display.
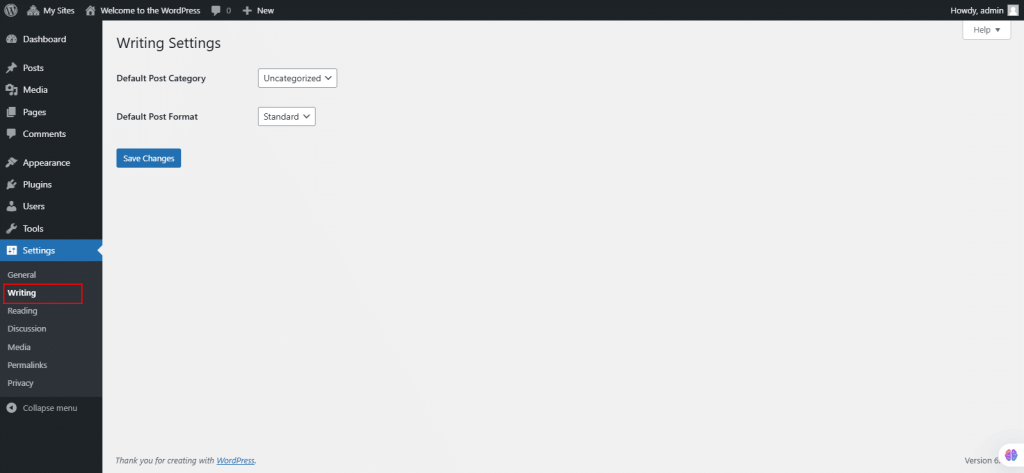
47. Under Settings, select Writing.
The Writing Settings screen manages options for creating and publishing content, including categories, formats, and remote publishing
- Default Post Category: Automatically assigns this category to posts without a specified category.
- Default Post Format: Sets a default format for posts (e.g., Standard, Aside, Gallery) if supported by the theme.
- Post via Email:
- Allows posting via email to a secret address with POP3 access.
- Requires configuration of mail server, port, login, and password.
- Assigns a default category for email posts.
- Update Services: Notifies listed services when new posts are published. Enter service URIs, separated by line breaks.
- Save Changes: Save and confirm updates to the writing settings.
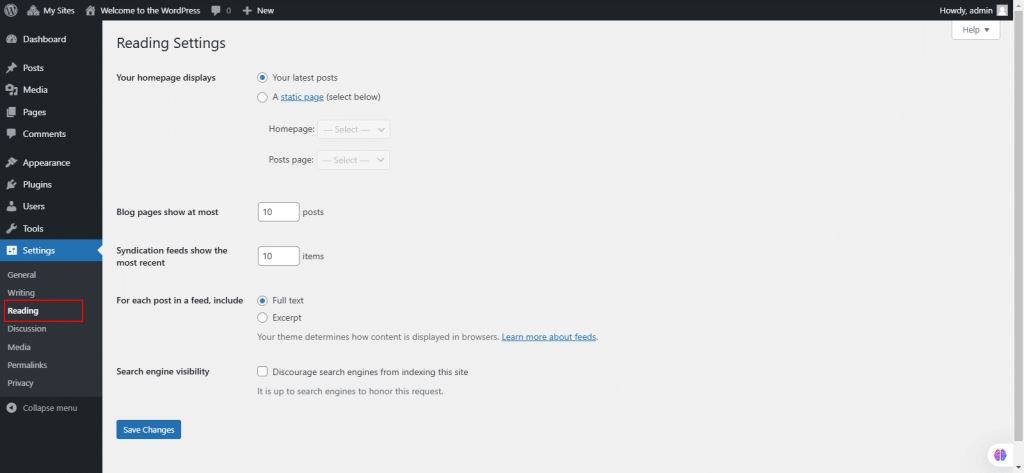
48. Under Settings, select Reading.
The Reading Settings screen controls how content is displayed on your site’s front page and in feeds, as well as search engine visibility.
- Front Page Display:
- Choose between displaying latest posts or a static page as your home page.
- Select specific pages for the Home Page and Posts Page (must be different).
- Blog Pages Show at Most: Set the maximum number of posts displayed per page.
- Syndication Feeds:
- Set the number of recent posts displayed in feeds.
- Choose to show full text or excerpt in feeds.
- Search Engine Visibility:
- Option to discourage search engines from indexing your site (adds meta tags and modifies robots.txt).
- Does not block normal visitor access.
- Save Changes: Save your settings and confirm changes with a success message.
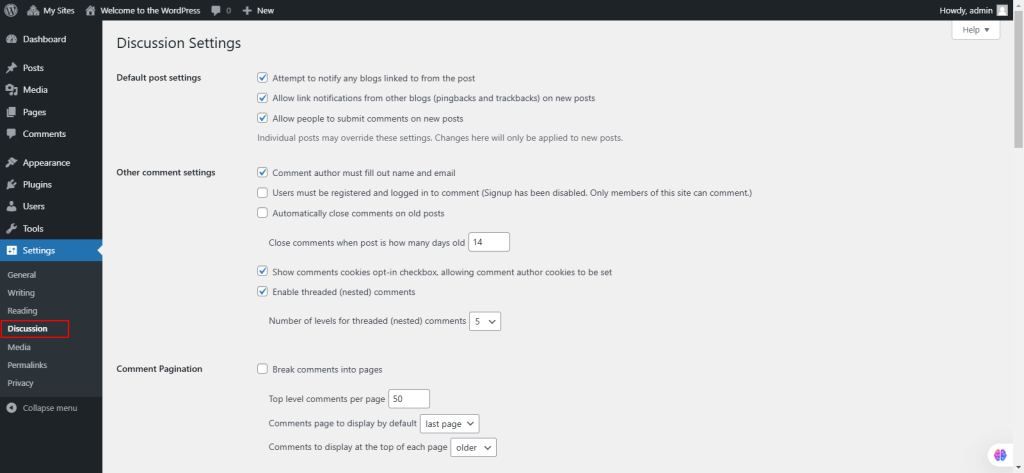
49. Under Settings, select Discussion.
The Settings Discussion Screen manages options for comments, pingbacks, and trackbacks, and provides spam and email notification controls.
- Default Article Settings:
-
-
- Notify blogs linked in the article.
- Allow pingbacks and trackbacks.
- Enable or disable comments (can override per article).
-
- Other Comment Settings:
-
- Require commenters to provide a name and email.
- Restrict commenting to logged-in users.
- Automatically close comments after a set period.
- Enable threaded comments (up to 10 levels).
- Paginate comments and choose display order.
- Comment Pagination:
- Breaks comments into pages.
- Top level comments per page.
- Comments page to be displayed by default.
- Comments that are displayed at the top of each page.
- Email Notifications:
-
- Notify when:
- A comment is posted.
- A comment is held for moderation.
- Notify when:
- Before a comment appears:
- Comment must be manually approved.
- Comment author must have a previously approved comment.
- Comment Moderation:
-
-
- Hold comments with more than a set number of links.
- Add spam-trigger words (moderation queue).
- Blocklist words to mark comments as spam for deletion.
- Disallowed Comment Keys: It blocks comments with specified words or IP addresses in the content, author name, URL, email, IP, or user agent. Add one word/IP per line. Matches are partial (e.g., “press” blocks “WordPress”).
-
- Avatars:
-
-
- Enable/disable avatar display.
- Set a maximum rating for avatars (G, PG, R, X).
- Choose a default avatar for users without custom ones.
-
- Save Changes:
-
- Click Save Changes to apply updates.
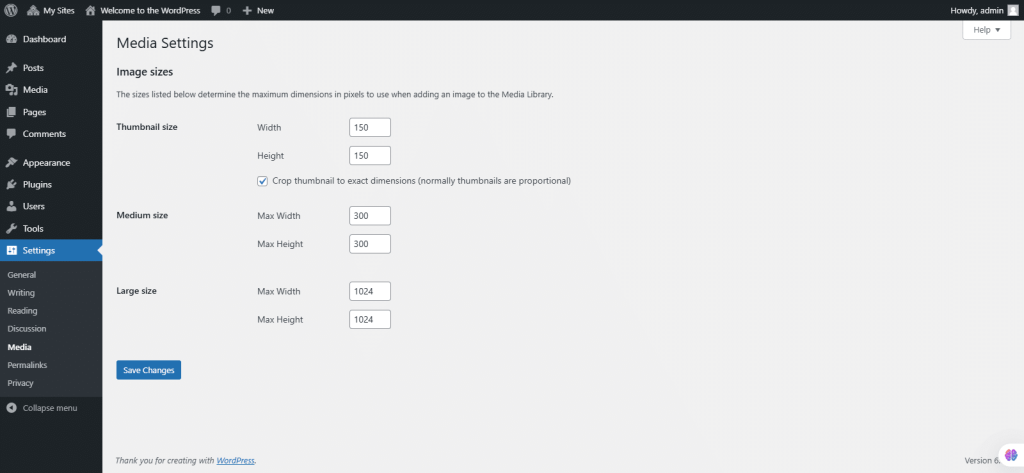
50. Under Settings, select Media.
The Settings Media Screen manages image dimensions and media upload settings for posts and pages.
- Image Sizes:
- Thumbnail Size: Set width and height; optionally crop to exact dimensions.
- Medium Size: Set maximum width and height.
- Large Size: Set maximum width and height.
- Click Save Changes to apply updates. A confirmation will display when saved.
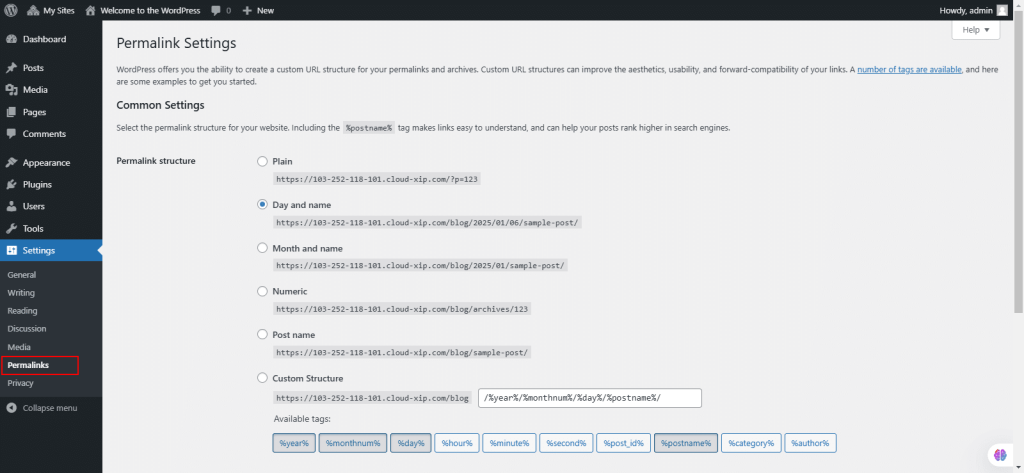
51. Under Settings, select Permalinks.
The Settings Permalinks Screen lets you configure the URL structure for your posts, pages, categories, and tags.
Permalink Structure: Choose from predefined structures.
- Plain: e.g., /?p=123
- Day and Name: e.g., /2008/03/31/sample-post/
- Month and Name: e.g., /2008/03/sample-post/
- Numeric: e.g., /archives/123
- Post Name: e.g., /sample-post
- Custom Structure: Define your own format.
- Optional Customization: Set custom bases for category and tag URLs (e.g., /topics/ for categories).
- Click Save Changes to apply settings. A confirmation will appear if saved successfully.
- If .htaccess is writeable, WordPress auto-updates. If not, you’ll need to manually update the .htaccess file with provided rules.
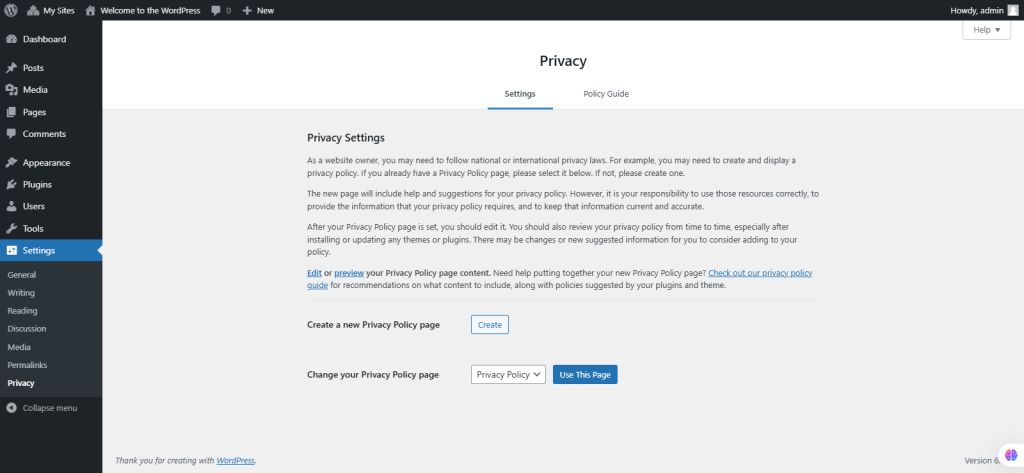
52. Under Settings, select Privacy.
The Privacy Settings tool in WordPress helps administrators manage their site’s Privacy Policy page:
- Click Create New Page to generate a Privacy Policy page or select an existing page from the dropdown and click Use This Page.
- If creating a new page, the Privacy Policy template opens. Modify and click Publish.
- For help, use the Check out our guide link for content suggestions.
Privacy Policy Page Display:
- The Privacy Policy page link appears on the login and registration pages.
You must manually link to the Privacy Policy page on all site pages, though themes like Twenty Twenty Five add this automatically.
53. From the left navigation menu, select Collapse menu.
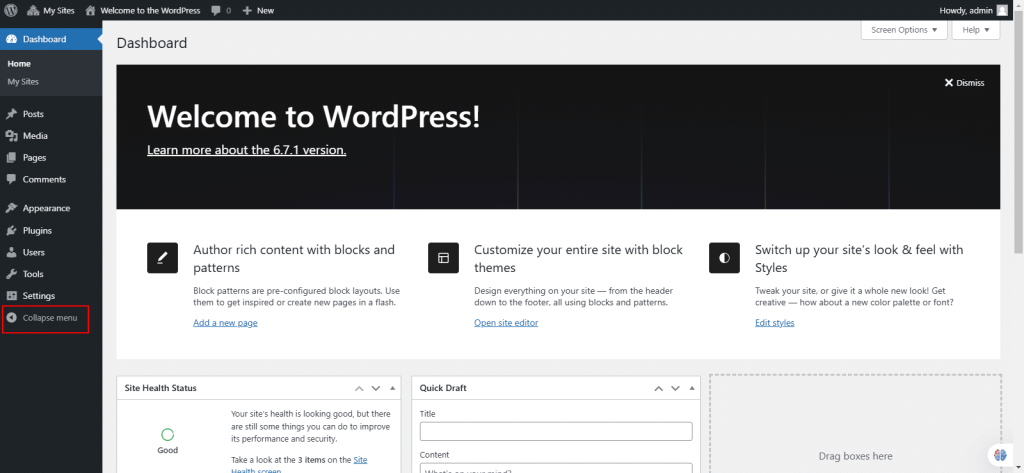
54. The screen below appears when the Collapse menu is selected.
Optimizing your WordPress site’s performance
Optimizing WordPress improves user experience, boosts traffic, and enhances SEO. A faster site reduces bounce rates, increases engagement, and improves search rankings. It leads to higher conversion rates, ensures mobile-friendliness, and reduces server load, cutting hosting costs. Regular optimization helps maintain stability, handles more content, and enhances security by keeping your site updated and protected. Some of the ways to optimize your WordPress website are:
1. Optimizing images: Due to large file sizes, images can slow down your website. So, to improve load times, resize images before uploading using tools like Photoshop or ImageOptim. Alternatively, you can also use WordPress plugins like Smush or Jetpack, which automatically optimize and compress images when uploaded. Jetpack also resizes images for mobile devices to enhance speed, and if you’re using WordPress.com, these features are already enabled.
Choose the correct format (JPG/PNG/GIF) and compression for each image. Also, consider using a newer image format like WebP, which is smaller in size.
2. Caching: Caching speeds up your WordPress site by storing a copy of your content in a visitor’s browser, reducing load times on return visits. Plugins like WP Super Cache and W3 Total Cache help enable this, with varying levels of customization and complexity. However, if you have a WordPress.com site, caching is already managed for you, eliminating the need for plugins and settings adjustments.
3. Deactivate unused plugins: Reducing unnecessary code and data processing can boost your WordPress site’s performance. Review your active plugins and deactivate any that aren’t needed, such as ones installed by your host or temporary migration tools. WordPress.com sites already handle many functions like security, backups, and caching, so you don’t need plugins for those. If unsure, deactivate a plugin and check if it affects functionality; if not, delete it.
To deactivate, go to Plugins → Installed Plugins and click Deactivate. You can always reactivate it later if needed.
4. Commercial DNS Service: Using a reliable commercial DNS service, like WordPress.com, can improve your site’s performance. DNS converts website names into IP addresses, and a faster DNS service ensures quicker domain lookups, speeding up your site’s loading time. Choosing a reputable provider enhances reliability and speed.
5. WordPress Theme: When choosing a WordPress theme, focus on performance as well as design. Select one with essential features, quick load times (check demos on desktop and mobile), and positive, recent reviews. Ensure good support options and recent updates to stay compatible with the latest WordPress version. Avoid heavy themes that add unnecessary extras.
6. To optimize your WordPress site, start with a reliable hosting service that ensures fast speeds, high uptime, and WordPress-specific features like automated backups and updates. WordPress.com offers secure, fast servers and expert support, along with a content delivery network (CDN) and Jetpack speed tools to enhance your site’s performance without additional effort.
And that’s everything there is to know about setting up an optimized WordPress server. Happy publishing!


