


Kamatera offers scalable virtual infrastructure solutions, including cloud servers, load balancers, and storage, tailored for developers, startups, and enterprises. Whether you’re launching a simple website or deploying complex cloud-based applications, setting up a Kamatera account is your first step toward accessing powerful and flexible computing resources.
This guide walks you through the process of creating a Kamatera account, verifying your credentials, and getting ready to launch your first cloud server, all in just a few minutes.
Follow along with our video tutorial:

Step-by-step guide
- From the Kamatera website, click Start Your Free Trial or Get Started to begin the registration process.

- On the registration page, you’ll be prompted to enter your email address and password for your new Kamatera account.
- If you already have an account, click Login to sign in using your existing account.
- If you are a new user, click Create Free Account to proceed with setting up your free trial.
Note: Make sure to use a valid email address that you have access to, as it will be used for account verification and important notifications.

- After submitting your email address, you will receive a confirmation message on the screen indicating that a verification link has been sent to the email address you provided.

- Check your inbox (and your spam or junk folder, just in case) for an email from Kamatera. Open the email and click on the verification link to confirm your email address. This step is required to activate your account and proceed with the registration process.

-
- After clicking the verification link, you will see a confirmation message saying “Email Validation Completed Successfully.” You will then be automatically redirected to the Kamatera Management Console, where you can begin setting up and managing your cloud infrastructure.
- Now that you have successfully logged into your Kamatera account, the next step is to add a billing profile. This is a mandatory step to activate your account and access cloud services. On the dashboard, click on the Add Billing Profile button.
- After clicking the verification link, you will see a confirmation message saying “Email Validation Completed Successfully.” You will then be automatically redirected to the Kamatera Management Console, where you can begin setting up and managing your cloud infrastructure.

Set up your billing profile
- You will be directed to a form where you’ll need to enter your billing details, including your name, address, and phone number. Kamatera requires this information to verify your identity and enable a free trial or paid services. Click Next.

- You will be redirected to a page where you are required to enter your billing information.
Once you’ve entered your credit card information, click Finish to complete the setup.
Note: Kamatera provides a promotional offer to every client, giving you your first 30 days of usage free. This includes one cloud server (up to $100 in value), 1,000 GB of cloud block storage, and 1,000 GB of outgoing internet traffic. It is an excellent opportunity to explore and test the platform’s capabilities at no initial cost.

- Now that your account is ready, let’s set up a VPS plan. To get started, click on the Servers under My Cloud, located on the left side of your screen. Once you click on Servers, you will see the server management panel. Next, click on the Create New Server button. You will then be redirected to a configuration page where you need to select a server location.

- Select a data center location closest to your users for the fastest response times and best performance.

- With Kamatera, you can choose from a variety of operating system images, including server OS images, desktop OS images, application images, service images, or upload your own custom OS.

Note:
- After selecting your operating system, you will need to choose a specific version and then configure your server’s specifications. This includes selecting the server type, number of CPUs, amount of RAM, SSD storage capacity, and deciding whether to enable daily backups or opt for managed services. Next, you’ll configure the networking settings by choosing between a public or private network, or both, depending on your requirements. You will then need to create a password, specify the number of servers you want to deploy, and assign a name to your server. Before finalizing the setup, you have the option to install scripts and create an SSH key, though these steps are optional. Finally, choose a monthly or hourly billing cycle.
- For more details on Windows server configuration, refer to How to Configure a Windows Server on Kamatera.
After completing the configuration, click Create Server. Kamatera will deploy your server in less than a minute, and it will be ready to use.
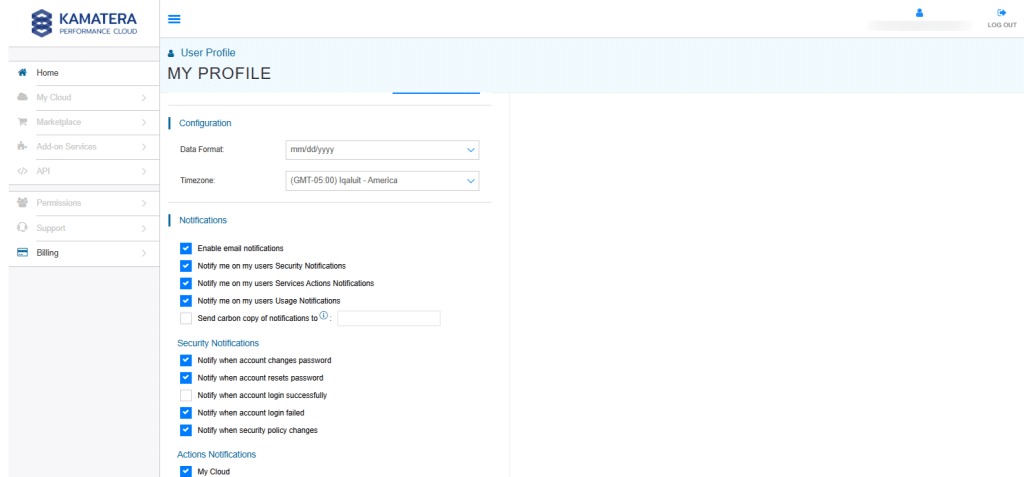
- You can view your profile by clicking on your email address located in the top-right corner of the dashboard. From here, you can update your login settings and adjust your account’s security preferences. If you scroll down, you’ll also have the option to change your password and configure your preferred data format and time zone.

- You can also customize which notifications you receive and choose how and where you receive them.
- Lastly, you can check your account status, view your login activity, and choose to disable your account if needed.


From the left-side menu, you can explore various options to manage your account, servers, billing, and other cloud services.
Now that your Kamatera account is fully configured, you can start creating and managing cloud servers, explore the available features, and scale your infrastructure as needed. This guide covers the essential steps to getting you started. Navigate to the dashboard to take full advantage of Kamatera’s powerful and flexible cloud platform.