


Zentyal is a Linux server management platform that provides a simpler alternative to Windows Server, designed with small and medium businesses (SMBs) in mind. Think of it as a complete package that handles all your basic business server needs through a web interface that’s much easier to use than traditional Linux servers. Features like configuration backup, real-time monitoring, and detailed reporting ensure reliability, security, and ease of maintenance, making it ideal for small to medium-sized infrastructures.
Zentyal is particularly valuable for SMBs because it packages complex server technologies into a simpler, more approachable system that don’t require Linux expertise.
Here is a step by step guide on how to configure and use Zentyal for SMBs.
Create your Kamatera account
- Enter your credentials to access the Kamatera management console. Click Login.

2. Navigate to My Cloud on the left-hand side. Select Servers.
On the left-side navigation menu, click on Create New Server or use the Create New Server option on the right-hand side.

3. Choose the zone from the following options:
- Asia
- Australia
- North America
- Europe
- Middle East
Depending on the zone you select, the available countries will be displayed. In this example, we used the Asia server domain to set up the Zentyal Server.

4. Kamatera offers a variety of app and server images to help users set up preconfigured resources. Users can explore options including:
- Server OS images
- Desktop OS images
- App images
- Service images
- My private images
Choose Apps Images and select Zentyal Server.

5. In Choose Version, select the latest version of Zentyal. Here, it is Zentyal 7.0 ubuntuserver 20.04.

6. After selecting the version, toggle the Detailed view button to ‘on’ to view the detailed description, including the price.
Choose server specs:

| Field | Description |
| Type | Type B-General Purpose: Server CPU are assigned to a dedicated physical CPU thread with reserved resources guaranteed.
Type D–Dedicated: Server CPU are assigned to a dedicated physical CPU Core (2 threads) with reserved resources guaranteed. Type T-Burst: Server CPU are assigned to a dedicated physical CPU thread with reserved resources guaranteed. Exceeding an average usage of 10% will be extra charged for CPUs usage consumption. Type A-Availability: Server CPUs are assigned to a non-dedicated physical CPU thread with no resources guaranteed. Note: More information on CPU types is available on the My Cloud-Pricing page. |
| CPU | Choose the number of vCPUs that will be installed on the server. Type B/T can be configured with up to 104 vCPUs per server. Based on Intel’s latest Xeon Processors, 2.7 GHz+. |
| RAM | Choose the amount of RAM that will be installed on the server. Type B/T/D can be configured with up to 512 GB RAM per server. |
| SSD DISK | Choose SSD Storage Size. You can add up to 15 SSD Disk. SSD Storage includes unlimited IOPS and unlimited storage bandwidth, free of charge. |
| Daily Backup | Toggle the switch to enable extended daily backups of your server’s storage to external backup storage. |
| Management Services | Toggle the switch to enable Management Services to the server’s operating system by Kamatera’s technical support team. |
7. Choose networking
You can select network, whether it’s a public Internet network or a private local network.

| Field | Description |
| Public Internet Network | Check to connect the server to a network interface connected to Public Internet Network. |
| Private Local Network | Check to connect the server to a network interface connected to Private Local Network. |
8. Advanced mode

| Field | Description |
| NIC #1 | Select WAN from the options available in the drop-down menu.
Select auto from the options available in the drop-down menu.
Select auto from the options available in the drop-down menu.
|
| WAN Traffic | Select 5000 GB per month on 10 Gbit per second port. |
9. Advanced Configuration
Hide: If you want to hide the advanced configuration.
Show: If you want to see the advanced configuration.

| Field | Description |
| Install Script | Enter the script here to execute, once the server is created.
Note: For Windows system, use Power Shell. |
| Keep Server On Failure | Do not terminate server if start up script or provisioning fails. |
| Server Notes | Enter any server notes to be noted. |
| Tags | Select tags from the drop-down menu and click Add. |
10. Finalize settings
Finalize settings by setting the password, re-validating it, selecting the number of servers, specifying the server name, and enabling the Power On Servers option.

| Field | Description |
| Password | Select password
Password allowed characters: a-z, A-Z,0-9 !@#$^&*()~ and must need the following requirements:
|
| Validate | Re-enter the password to validate. |
| Servers | Select the number of servers. |
| Name #1 | Enter the name of the server. |
| Power On Servers | Switch on the toggle button to see the details. |
11. Billing Cycle and Pricing
You can choose monthly or hourly billing cycle.
Note: The Server Summary displays the location, operating system (including server specifications), add-on services, servers, and pricing.
Click Create Server.

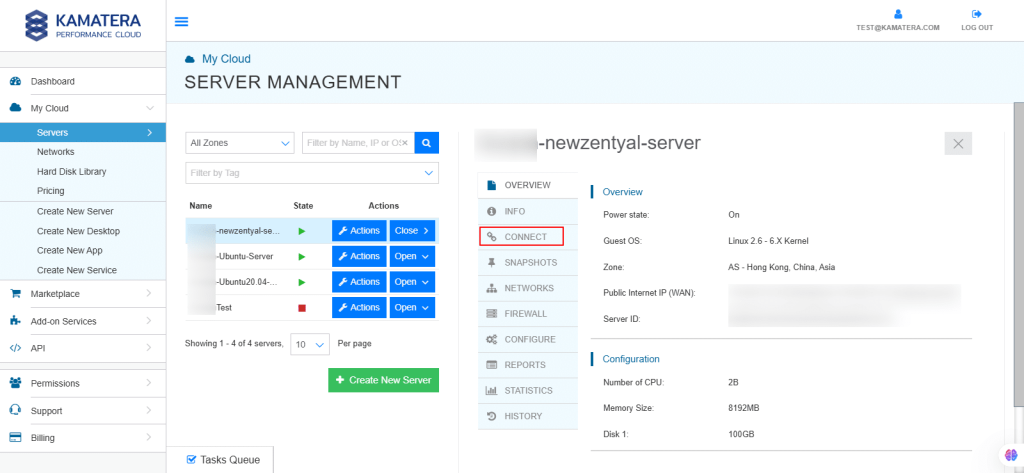
12. The server is added to the Tasks Queue. Once the server is created successfully, click on Open beside the server’s name.

13. On the right, the overview of the server is displayed. Click on Connect.
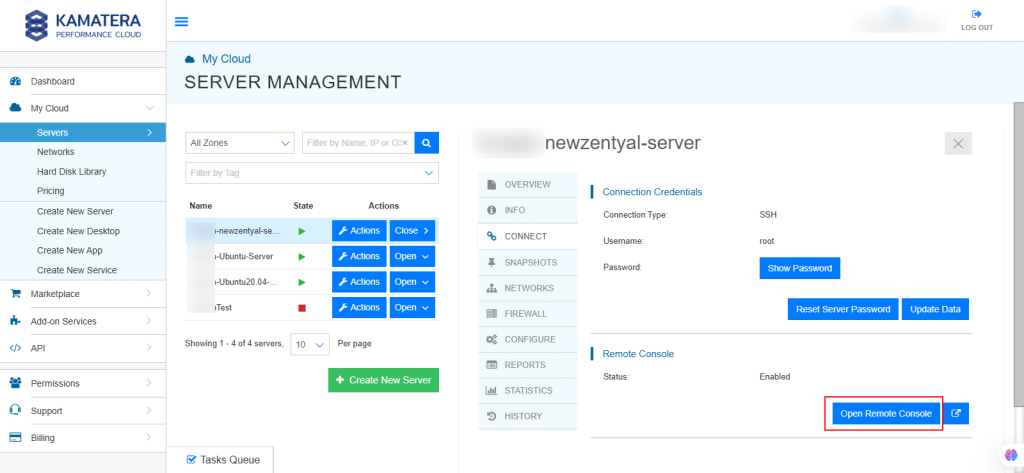
14. Connection credentials like Username and Password are displayed. Under Remote Console, click Open Remote Console.
Install the Ubuntu image
15. You will be directed to Ubuntu terminal. Hit ENTER.

16. Enter your login credentials. After that, Zentyal Admin URI, Admin User, Password are displayed on the screen.

17. Open the browser and in the new tab enter the Zentyal Admin URI given in the previous image that is https://<zentyal-server-ip:8443>
18. A new page will open, displaying a warning. Click Advanced.


20. Enter the username and password that were given in Step 16. Click ENTER.

21. When you access the web interface for the first time, you will be presented with a configuration wizard.

22. Note: If you are installing commercial edition or 45-day free trial from the ISO, you will be asked to enter the license activation key for installation.

23. During the initial setup, you’ll be prompted to select the functionalities you want to install and configure on your server. Zentyal will automatically manage dependencies between components. You can later install, remove, or update any of these components through the server’s interface. Click INSTALL.
Note: No components are selected in this example.

24. Zentyal will notify you of the dependencies required to support the components you’ve selected in the previous step. These dependencies will be automatically installed to ensure the proper functionality of your chosen services. Click CONTINUE.
Note: If you have selected any of the components, the screen below shows its dependencies.

25. The system will begin installing the selected modules, and a progress bar will display the installation status. During this process, you will also be provided with information about the commercial version of Zentyal.

26. In the next step, you’ll be prompted to define the basic network information. You need to specify which interfaces are External (typically connected to the Internet or gateways) and which are Internal (typically connected to the LAN). This classification will affect default firewall policies, network masquerading, and the default listening interfaces for other modules.
Select according to your requirements and click NEXT.

27. Configure various network parameters, such as wheher the IP is assigned by DHCP or set to a static configuration, and specify the associated IP address. These settings can be reconfigured at any time through the Zentyal interface.
Click NEXT.

28. After configuring the network interfaces, you will need to select the domain associated with your server and choose the type of Domain Controller you wish to deploy. The options are:
- Standalone server: This will be the first domain controller in the domain.
- Additional domain controller: This joins an existing domain as an additional controller.
For simplicity, we’ll select Standalone server for this example. You will only need to specify the domain name for your directory entities, ensuring it’s not confused with the DNS domain, which serves a different purpose.
Click NEXT.

29. In the next step, you’ll select the default virtual mail domain. The domain name chosen earlier will be used to autocomplete this field, but you can modify it if needed to suit your preferences.
Click FINISH.

30. Zentyal will apply the initial configuration for the installed components, setting them up based on the choices you made during the setup process.

31. Your Zentyal server is now ready.
Configure the Zentyal server
32. Once the initial configuration is complete, you can access the Dashboard and configure each of the installed components.
- The left side menu contains all the services that can be configured through Zentyal.
- The top menu contains actions such as the SAVE CHANGES button and Logout icon (to log out of your session).
- The central part consists of forms or tables about the service configuration that are selected from the left side menu.

33. From the left side menu, select Module Status.
Each Zentyal module handles a specific service. To configure a service, enable its corresponding module from Module Status. Modules selected during installation are automatically enabled.
- Some modules depend on others. For example, the DHCP module requires the Network module to serve IPs via configured interfaces. Dependencies are listed in the Depends column, and a module cannot be enabled unless its dependencies are active.
- When enabling a module for the first time, you must:
- Approve the actions to be performed.
- Review and accept the list of configuration files to be modified or overwritten.
Click ACCEPT to apply configuration changes in the module forms.

34. Enable a module by checking the box next to it.
Note: Here, the box next to Logs is checked.

35. A pop-up window will opens. Click on SAVE or DISCARD CHANGES to apply the configuration changes. Or, click the Save Changes button in the top menu to apply them permanently. This button appears only when there are unsaved changes.

36. From the left side menu, select System-> General.
Zentyal offers flexibility in its general system configuration, allowing users to tailor several key settings to their needs.
- Administrator Accounts: Click ADD NEW to manage users with admin privileges.
- Language: From the drop-down menu, select the language and click CHANGE to change the interface language.
- Administrative Interface Port: By default, for Zentyal, port is 8443/TCP (HTTPS). However, it can be changed by clicking CHANGE and entering the new port.
Then the URL becomes https://<ip_address>:<port>/.
Hostname: You can change the hostname or domain (e.g., zentyal.home.lan), used as an ‘A’ record in the local DNS.

37. From the left side menu, select System-> Date/Time.
- Click CHANGE, and from the drop-down menu, select Time zone, Date, and Time according to your requirements.
- Click SAVE CHANGES.

38. From the left side menu, select System-> Configuration Backup.
Zentyal includes a configuration backup service to recover the server in case of disasters like hardware failure or configuration errors.
- Backups include only module configurations, not data.
- Use the Zentyal Backup module or manual methods to back up data separately.
- Backup files are saved locally in /var/lib/zentyal/conf/backups/.
- Recommended: Save copies to an external system for additional security.
- Enter a name for the backup and click BACKUP to initiate the process.
- A progress window will display the backup status. Once completed, the Backups list will display: Backup creation date, size, and options to restore, download, or delete backups.
- Click RESTORE backup from a file option to upload a previously saved configuration file and restore it. This is useful for restoring configurations from another Zentyal server.
Click GENERATE AND DOWNLOAD REPORT FILE to generate a file with the status of your system. If you want to report a problem or seek support, then this file would be useful.

39. From the left-side menu, select System-> Halt/Reboot.
By clicking on HALT or REBOOT, you can halt or reboot your server.

40. From the left side menu, select System-> SmartAdmin.
As this is a development edition, this feature is not available, but you can view system status report by using Command Line Interface.

41. From the left side menu, select Logs.
Zentyal’s log module is a robust tool that helps administrators track and manage various services and actions within the infrastructure. The logs are stored in a MySQL database, providing an easy way to query, filter, and generate reports based on different services or domains within the system.
- Go to Module Status and check/enable the box next to Logs module.
- Once enabled, you can access logs via Logs > Query logs in the Zentyal menu.
- You can configure logs through Logs > Configure logs in the Zentyal menu.
Zentyal supports auditing of administrative activities:
- Configuration changes: Logs changes made by administrators, including the user, affected module, event type, and old/new values.
- Administrator sessions: Records login attempts, successful or not, along with session expirations, logouts, and associated IP addresses.
These logs are useful for managing servers with multiple administrators. You can enable them by clicking on the pencil icon under Actions.

42. You can get full reports of all log domains.
Under Query Logs, click wheel icon under Full Report.
You can view a complete list of actions for a selected domain and apply filters to query specific information. Queries can be saved as events, allowing you to receive notifications when a match occurs. Additionally, if a query doesn’t have an upper time limit, its results will automatically refresh with new data, ensuring real-time updates and continuous monitoring.

43. Under Logs->Configure Logs.
Zentyal log configuration options include:
Current Configuration:
- Enabled: if this option is disabled, no logs are written for this domain.
- Purge Logs Older Than: You can manually purge logs older than a specified time period (from 1 hour to 90 days).
To change it,
- Under the Force log purge, select time-period from the drop-down menu.
- Click PURGE.

And that’s it! You have learned all the ways to configure Zentyal.