


A subnet or subnetwork is a network within a larger network. Subnets make networks more efficient by logically segmenting IP address spaces, allowing for better organization, security, and performance. Through subnetting, network traffic can travel a shorter distance without passing through unnecessary routers to reach its destination, reducing latency and improving speed.
Subnets are a fundamental part of modern network design, allowing administrators to divide large IP networks into smaller, more manageable segments. This improves network performance, enhances security, and simplifies routing.
In Active Directory, subnets are not created to route traffic, but rather to map IP address ranges to specific AD Sites. This allows domain-joined computers and services to determine their physical network location, ensuring they connect to the nearest and most appropriate Domain Controller (DC). By properly defining subnets in Active Directory Sites and Services, organizations can optimize replication, streamline authentication, and enable location-aware services such as Group Policy, DFS, and logon services.
In this guide, we’ll walk you through the complete process of creating subnets at both the operating system level (on Windows Server and Windows 10/11) and within Active Directory.
Step-by-step guide
For this use case, we are using Kamatera to create a Windows Server instance. Kamatera provides ready-to-use Windows Server images that allow quick deployment without manual OS installation. Once the server is launched, you can connect via Remote Desktop and begin configuring network settings, Active Directory, and subnets as needed.
Part 1: Creating a Subnet at the operating system level
- First, create a Kamatera account and deploy a Windows server. Once the server is created, press Windows+R, type ncpa.cpl, and press OK.

2. This will open the Network Connections window. Now, right-click on the active adapter that is Ethernet and select Properties.

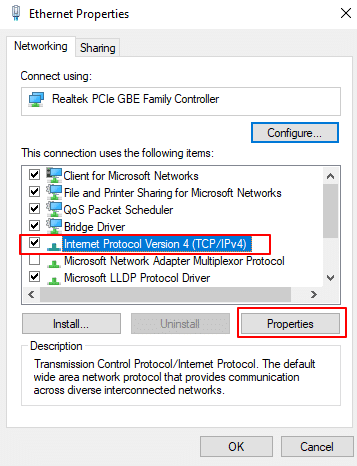
3. The Ethernet Properties window opens, choose Internet Protocol Version 4 (TCP/IPv4), and click on Properties.
4. When the Internet Protocol Version 4 (TCP/IPv4) properties window opens, choose Use the following IP address and add IP address, Subnet mask, and Default gateway (for example: IP address: 192.168.10.10, Subnet mask: 255.255.255.0, Default gateway: 192.168.10.1).
Click OK and then close the window.

After configuring a static IP address (e.g., 192.168.10.10), subnet mask (255.255.255.0), and default gateway (192.168.10.1) in Windows, your system becomes part of the 192.168.10.0/24 subnet. This allows it to communicate directly with other devices in the same subnet range without routing through a gateway, improving local network efficiency. Any traffic destined for IP addresses outside this subnet will be forwarded to the specified gateway for further routing. With this static configuration, your system has a fixed network identity, making it ideal for servers or devices requiring consistent access. It also ensures better integration with Active Directory environments, especially when the subnet is registered in AD Sites and Services. To avoid connectivity issues, ensure the chosen IP is not already in use and that appropriate DNS settings are configured for name resolution and domain services.
Note: If you’re in an Active Directory environment, make sure DNS is set to the domain’s DNS server (not just 8.8.8.8) so the system can join the domain, find domain controllers, and apply group policies correctly.
Part 2: Registering the Subnet in Active Directory
To set up Active Directory, you first need to install Active Directory Domain Services on your Windows Server. After the installation, the server can be promoted to a Domain Controller. Follow these steps:
- From the dashboard, click on Add Roles and Features.

2. The Add Roles and Features Wizard opens. At Before you begin, click Next.

3. At Select Installation Type, select Role-based or feature-based installation. Click Next.

4. At Select Destination Server, choose Select a server from the server pool. In Server Pool, make sure that your local computer is selected. Click Next.

5. At Select Server Roles, check the box next to Active Directory Domain Services from Roles. Click Next.

6. Next, you’ll be prompted to add the required features. The Add Roles and Features wizard opens. Click Add Features to proceed.

7. Click Next.

8. Make sure you read the information on the Active Directory Domain Services dialog. Click Next.

9. In the Confirmation dialog, click Install to install the selected roles, role services, and features on your server.

10. The installation process will start. Once it’s finished, click Close to exit the wizard.

Promote your server to domain controller
- When the installation is complete, click Notifications in Server Manager.
- Click the link titled Promote this server to a domain controller.

3. Once the Active Directory Domain Services Configuration Wizard dialog opens, select Add a new forest and enter the Root domain name (ex: ADtestsample.com).

In the Domain Controller Options dialog, leave Forest functional level and Domain functional level enabled as default.
Provide a secure password (kamatera@2024) for Directory Services Restore Mode.

- Ignore the warning given on the DNS Options dialog. Click Next.

- Select Next.
Verify your server’s NetBIOS domain name (ADTESTSAMPLE) and select Next.

- Select Next.
- Specify the locations for the following:
- AD DS Database folder
- Log Files folder
- SYSVOL folder
Unless you have a specific enterprise use case, it’s advisable to leave everything as default.

- Review your selections carefully, and once satisfied, click Next to proceed.

- The installation wizard will perform validation of prerequisites before proceeding with the installation of AD DS. Once all the checks are passed successfully, select Install to initiate the installation process.

- The installation process will commence.

- Once the installation is complete, click Close to finish the wizard. The system will restart.
Your Active Directory Services have now been installed successfully. Your machine will be rebooted automatically to apply the changes.
How to add a subnet
Type Server Manager in the search bar and open it. In the Server Manager dashboard, click on Tools in the top-right corner, then select Active Directory Sites and Services from the dropdown menu.

- In the left pane, right-click on Sites and select New Site. Enter a name for the new site, choose a site link object from the list, and click OK to create the site.
In Active Directory Sites and Services, a site link connects two or more AD Sites to enable replication of directory data such as user accounts, group policies, and other AD objects. It also represents the logical network path between sites.
Note: When AD is first installed, a default site link named DEFAULTIPSITELINK is created.
Now, you have created a new AD site.

- To proceed, enter the address prefix in the Prefix field using network prefix notation (e.g., 192.168.10.0/24).
- Select the corresponding site object to associate with this subnet, and then click OK to complete the configuration.

We have reached the end of the tutorial. The subnet is now successfully associated with the specified site, enabling Active Directory to map client IP addresses to their nearest domain controller based on site topology.