


In a wide array of network environments, assigning multiple IP addresses to a single network interface is essential for flexibility, scalability, and efficient resource management. Configuring additional IP addresses allows a single server to handle multiple network identities.
This guide explains how to add and configure additional IP addresses on Windows operating systems. By the end of this guide, you’ll be able to assign and verify additional IP addresses on your system, ensure the configuration persists after a reboot, and confirm that the setup is working as intended.
Step-by-step guide
For this use case, we are using Kamatera to create a Windows Server instance. Kamatera provides ready-to-use Windows Server images that allow quick deployment without manual OS installation. Once the server is launched, you can connect via Remote Desktop and begin configuring network settings, Active Directory, and subnets as needed.
- First, create a Kamatera account and deploy a Windows server. Once the server is created, press Windows+R, type ncpa.cpl, and click OK.

2. This will open the Network Connections window. Now, right-click on the active adapter that is Ethernet and select Properties.

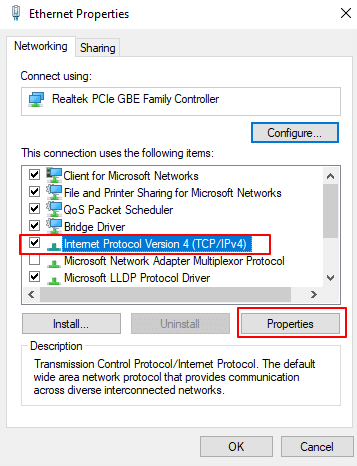
3. When the Ethernet Properties window opens, choose Internet Protocol Version 4 (TCP/IPv4), and click on Properties.
4. Then, the Internet Protocol Version 4 (TCP/IPv4) properties window opens, choose Use the following IP address and add IP address, Subnet mask, Default gateway, and Preferred DNS Server (for example: IP address: 10.0.0.150, Subnet mask: 255.255.255.0, Default gateway: 10.0.0.254, Preferred DNS server: 10.0.0.01).
Add additional IP addresses
Click Advanced to add additional IP addresses.

5. In the Advanced TCP/IP Settings window, navigate to the IP addresses section and click the Add button to assign an additional IP address to the network interface, as illustrated in the screen below.

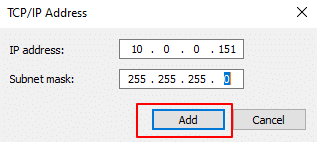
6. Enter the IP address and subnet mask in the respective fields, then click Add to apply the changes.
7. The newly added IP address will now appear in the list. Click OK to confirm.

8. Next, click OK in the Internet Protocol Version 4 (TCP/IPv4) Properties window, then click Close in the Ethernet Properties window to complete the configuration.
9. To verify the configuration, press Windows + R, type cmd, and press Enter to open the Command Prompt.
In the Command Prompt window, run the following command:
Command:
ipconfig
This command will display the list of IPv4 addresses assigned to your network interfaces. In the output, you should see the newly added IP address along with the existing ones, as shown in the screen below.

This confirms that the additional IP address has been successfully configured and is now active on the system. Congratulations, you have successfully added and configured additional IPs.