Let’s Encrypt is a free, automated, and open certificate authority that provides TLS/SSL certificates making it easy for websites to enable HTTPS encryption and create more secure Internet for everyone. Unlike other traditional SSL certificates that are valid for a year or more, Let’s Encrypt certificates are valid only for 90 days. This short validity period emphasizes the importance of setting up a reliable renewal process to avoid service interruptions or security warnings for your users.
This user guide provides a clear, step-by-step approach to renewing Let’s Encrypt certificates, both manually and automatically using Certbot, the most widely used client. Certbot is a free and open-source software tool that automatically enables HTTPS on manually administered websites by using Let’s Encrypt certificates. Certbot is made by the Electronic Frontier Foundation (EFF). Whether you’re managing a single server or multiple web applications, this guide will help you maintain secure and uninterrupted HTTPS connections.
Prerequisites
Before proceeding, ensure the following:
- You have root or sudo access to your server.
- Let’s Encrypt was initially installed using Certbot (or note the client used).
- Your web server (Apache, NGINX, etc.) is properly configured.
Step-by-step guide
To set up SSL/TLS with Let’s Encrypt, you must run the necessary commands directly on your server where the website is hosted.
First, create a Kamatera account and deploy a server. Once your Kamatera server is up and running, you’ll connect to it via SSH to perform the setup using Certbot.
Note: For this example, an Ubuntu server has been created using a Kamatera-provided server image.
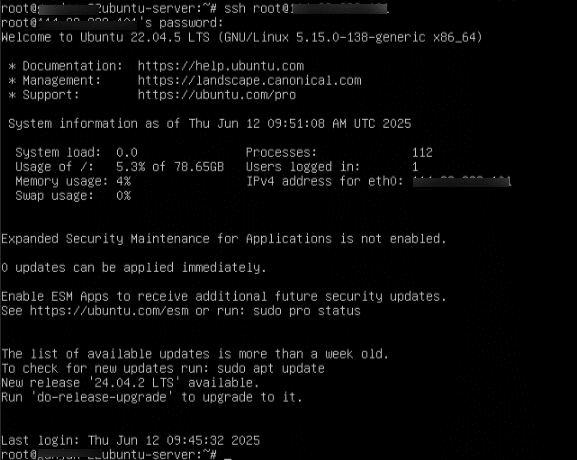
- Log in to the server using your credentials.

Command:
ssh root@your-server-ip

Note: Replace your-server-ip with the actual public IP address of your Kamatera instance.
When prompted “Are you sure you want to continue connecting (yes/no/[fingerprint])”, type yes and hit Enter.
Then enter your server password when prompted.

Now, run all the Certbot and server configuration commands from inside that SSH session.
Configure your web server
3. To find out what server stack you’re using (i.e., which web server software like Apache, NGINX , etc. is running), you can use a few quick methods, depending on your access and system.
Run this command to list active web server processes:
Command:
ps aux | grep -E 'apache2|httpd|nginx'

Note:
- If you see apache2 or httpd → You’re using Apache.
- If you see nginx → You’re using NGINX.
Otherwise, you can run the below commands:
Command:
sudo systemctl status apache2

sudo systemctl status nginx
Note: One of these will show active (running)- that’s your server.
4. If NGINX or Apache2 are not already installed, then follow the instructions below to install NGINX.
Command:
sudo apt update

Command:
sudo apt install nginx –y

Now, run the below commands to start, enable, and check the status of NGINX
Command:
sudo systemctl start nginx

sudo systemctl enable nginx

sudo systemctl status nginx

5. Confirm the Certbot is installed and available by running the command below:
Command:
certbot --version

Note: As certbot is not yet installed, you will get message as the Command ‘certbot’ not found.
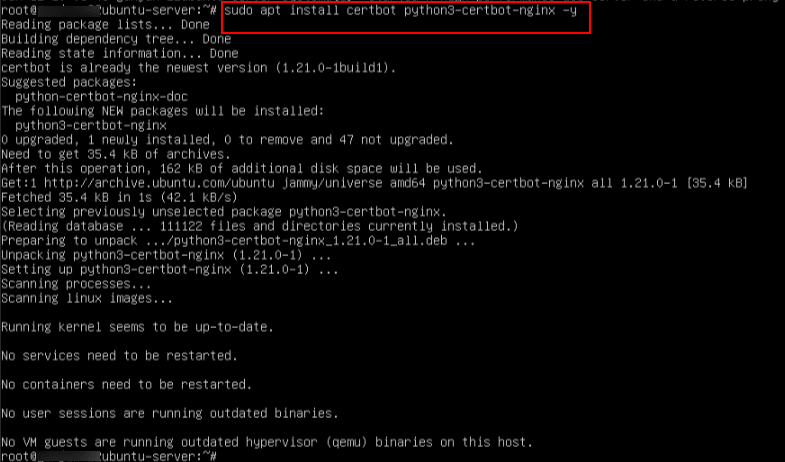
6. Install certbot by running the below command
Command:
sudo apt install certbot python3-certbot-nginx -y

7. Now, check the installation of certbot by running the below command.
Command:
certbot --version
You will see certbot 1.21.0 indicating that certbot is installed.
8. After installing Certbot, you need to run a command to request the certificate. For example, for NGINX:
Command:
sudo certbot --nginx
Install an SSL/TLS certificate
After running the above command, Certbot begins an interactive wizard to help you request and install an SSL/TLS certificate. Here’s what each prompt means:
-
- Enter email address (used for urgent renewal and security notices) (Enter ‘c’ to cancel): yourname@example.com
Certbot needs your email to notify you about certificate expiry and alert you about security issues with Let’s Encrypt. So, type a valid email address and press Enter.
Note: Press Enter C to cancel: This is just a way to exit if you change your mind. You can ignore it if you’re proceeding.
2. Accept Terms of Service
Certbot will ask to read the terms of service. So, type Y and press Enter to proceed.
3. Share Email with EFF (optional)
Certbot may ask to share email with EFF, you can type N (your choice).
4. Domain selection
Certbot will ask to enter the domain names you would like on your certificate and press Enter.

Note: For Apache, run the command:
sudo certbot --apache
9. After you enter the domain, you will see the message “Successfully received certificate.”
You will also see:
- The location where the certificate and private key are saved
- The certificate’s expiry date
- The location where the certificate has been deployed

10. Next, verify Certificate Installation
Visit your site in a browser: https://yourdomain.com
Make sure:
- No security warnings appear
- The padlock icon is visible in the address bar
- Certificate shows Let’s Encrypt as the issuer
11. Before performing the actual renewal, it’s good practice to run a test. This simulates a renewal without changing anything
Command:
sudo certbot renew --dry-run

12. To manually renew all certificates, run the below command:
Command:
sudo certbot renew
Certbot will check all installed certificates and renew any that are due to expire.

13. Once the certificate is renewed, reload or restart the web server so it picks up the new certificate:
For NGINX
Command:
sudo systemctl reload nginx

Note: For Apache, command: sudo systemctl reload apache2
14. To ensure certificates are renewed automatically, use one of the following:
- Cron Job Example:
Open the crontab and run the below command:
Command:
sudo crontab –e
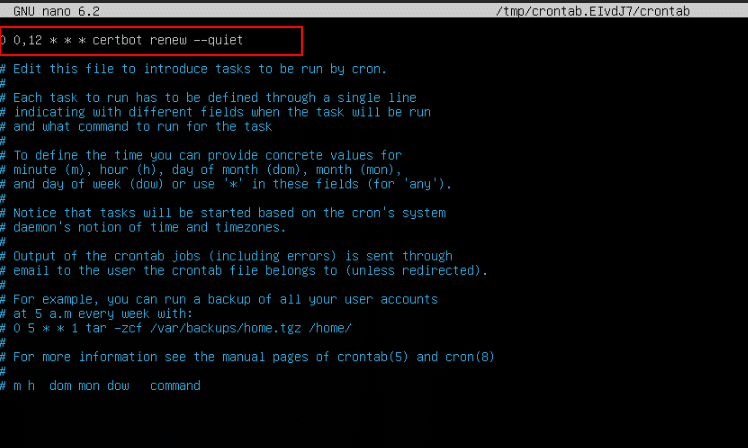
You will be asked to choose an editor; here, Nano is selected by typing 1 as shown in the screen below.

Check certificate renewal
A Nano editor will open. Now, add this line to check renewal twice daily:
Command:
0 0,12 * * * certbot renew –quiet
Note: Runs twice a day at midnight (00:00) and noon (12:00) every day
- 0: At minute 0
- 0,12: At hour 0 (midnight) and 12 (noon)
- *: Every day
- *: Every Month
- *: Every day of the week
- certbot renew: Checks if any certificates are close to expiring (within 30 days) and renews them automatically
- –quiet: Suppresses output unless there’s an error

Once the line is added, exit the editor by pressing Ctrl + X. You will then be prompted with “Save modified buffer?”- type Y to save the changes, and press Enter to confirm the file name.
After exiting the Nano editor, you will see the message: “crontab: installing new crontab”, indicating that the changes have been successfully applied.

- Systemd Timer (if available)
Check if Certbot’s timer is active:
Command:
sudo systemctl list-timers | grep certbot
This command helps you confirm that Certbot’s auto-renewal timer is active, see when the next renewal check is scheduled, and troubleshoot SSL issues that may arise due to missed or failed certificate renewals.
- sudo systemctl list-timers: Lists all active timers on your system (timers are used to schedule tasks via systemd, like a modern version of cron).
- | grep certbot: Filters the list to show only timers related to Certbot, the tool used to auto-renew your Let’s Encrypt SSL/TLS certificates.
Note: If not enabled, then run the below commands
Command:
sudo systemctl enable certbot.timer

sudo systemctl start certbot.timer

Output Explained: Thu 2025-06-12 21:38:57 UTC 10h left n/a n/a certbot.timer certbot.service
- Next Run Time: When the certbot.timer is scheduled to run next
- Left: How much time is left until it runs
- Unit: The timer unit (certbot.timer)
- Activates: The actual service it will trigger (certbot.service)
15. After renewing, check your new certificate’s expiration date:
Command:
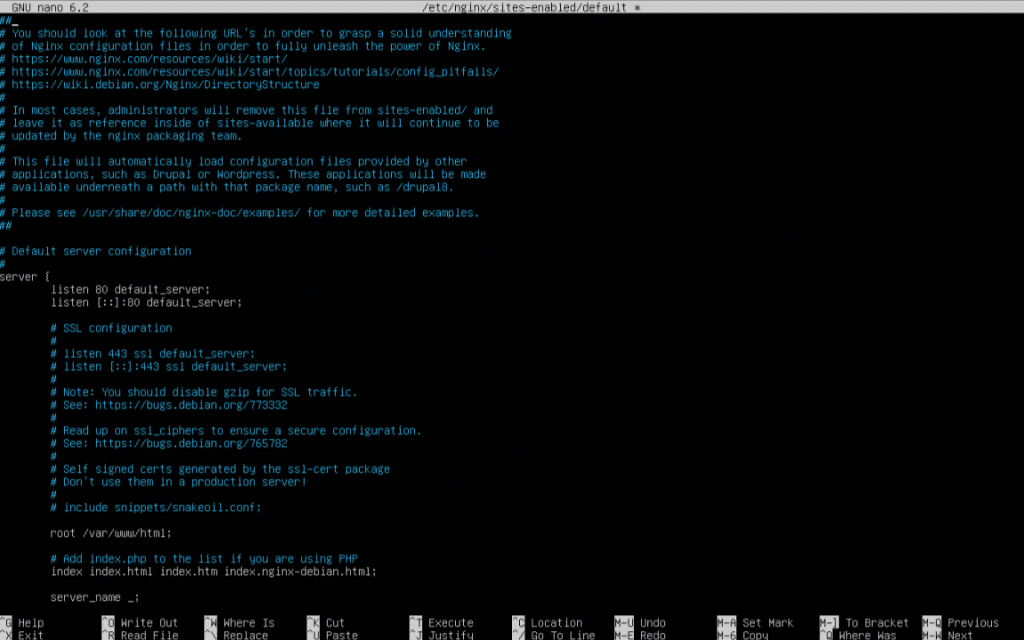
sudo nano /etc/nginx/sites-enabled/default
This command is used to open and edit the default NGINX site configuration file using the Nano text editor.
-
- sudo: Grants administrator privileges needed to edit system files.
- nano: Launches the Nano text editor in the terminal.
- /etc/nginx/sites-enabled/default: This is the path to the default virtual host configuration for NGINX on Ubuntu systems.

Once the Nano editor opens, you will see the configuration details, where you can make the necessary changes.

And that is the end of the process. You can use the above command to modify how NGINX handles HTTP and HTTPS traffic by editing the default server configuration. It allows you to set up or change server blocks, such as configuring domain names, ports, root directories, and redirects. This file is also used to add a redirect from HTTP to HTTPS, specify the paths to SSL certificate and key files after installing Let’s Encrypt, and configure additional settings like custom error pages, reverse proxy rules, or static file hosting.


